How to Set Up and Approve Requirements on Records
- How to Set Up Records for Contractor Companies
- How to Set Up Records for Individual Workers
- How to Approve or Reject Records
- How to Set Up Inductions for Site Locations
How to Set Up Records for Contractor Companies
How to Set Up Records for your Contracting Companies
1. Log into the admin portal
2. Tap on the "Records" button

Step 1: Tap on the "Records Type Settings"

Step 2: Tap on the "Add Records Type"

Step 3: Give this record a Name/title ie: "Safe Work Method Statements"

Step 4: To make this record available to the Contractor Company, please select "Company" in the Category dropdown list and select the options which are relevant for this record. Once done, please tap on the "Save" button.
Definition of options:
Active: Select this if you require the Company to fill/respond back to this record type. You must select this to have the record displayed in the users Records List - it activates the record for completion.
Document Upload: Select this if you require the company to upload a file to support this record type
Expire Required: Select this if you want to capture the expiry date of this record
Number/ID Required: Select this if you require to capture the record number, an example may be the Policy Number or Licence number
County Required: Select this if you want to capture the Country this record is recognised for
State Required: Select this if you want to capture the State this record is recognised for
Approval Required: Select this if you wish to review and approve the record captured. If you do not need to review/verify this record, please leave this option un-checked
Worker Sign Off Required: Select this option if you would like the Contractor Worker to acknowledge that they have viewed the information the Company has submitted against this record

How to Set Up Records for Individual Workers
1. Log into the admin portal
2. Tap on the "Records" button

Step 1: Tap on the "Records Type Settings"

Step 2: Tap on the "Add Records Type"

Step 3: Give this record a Name/title ie: "Safe Work Method Statements"

Step 4: To make this record available to the Contractor Company, please select "Individual" in the Category dropdown list and select the options which are relevant for this record.
Definition of options:
Active: Select this if you require the Company to fill/respond back to this record type. You must select this to have the record displayed in the users Records List - it activates the record for completion.
Document Upload: Select this if you require the company to upload a file to support this record type
Expire Required: Select this if you want to capture the expiry date of this record
Number/ID Required: Select this if you require to capture the record number, an example may be the Policy Number or Licence number
County Required: Select this if you want to capture the Country this record is recognised for
State Required: Select this if you want to capture the State this record is recognised for
Approval Required: Select this if you wish to review and approve the record captured. If you do not need to review/verify this record, please leave this option un-checked
Step 5: Select which site this worker can work on in the check-box options available: Once done, please tap on the "Save" button.

How to Approve or Reject Records
Review Records
1. Log into the admin portal
2. Tap on the "Records" button

Step 1: Tap on the search icon and type in the Company you wish to review. Alternatively, you can scroll down the page until you find that Company.

Step 2: To view the records for this Company, tap on the "View Records" agains the company listing

Step 3: You will now see a list of records submitted by this company, to view documents that may have been uploaded, tap on the download document icon

Step 4: To approve this record, tap on the "Approve" button. This will also allow you to add any comments you wish the Contractor Company Admin to see. Once approved, this record tile will go green.
To Reject this record, simply tap on the "Reject" button and add notes to help your Contractor understand what is needed for this record.

How to Set Up Inductions for Site Locations
Site Locations
Site locations can be added manually by clicking Add Site. This is typically used when TIKS is used as a standalone package, not integrated to 3rd party applications.
Site Locations will be brought across to TIKS automatically if Procore integration is being used.
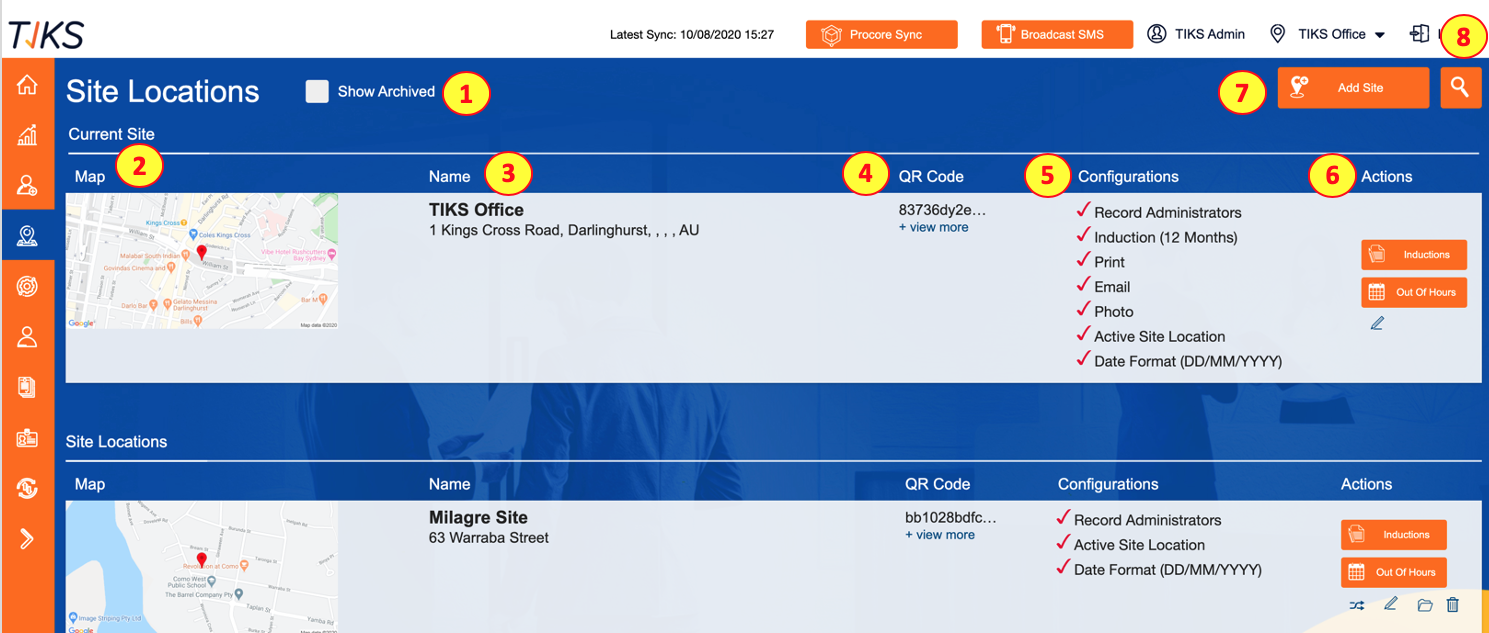
- Site Locations: This section shows a list of all of the site locations also available to switch to. This also includes all of the same details as the Current Site which will be explained.
- Map: This shows the map that is generated using a Google maps API from the input address.
- Name: This is the naming of the site, generally companies use the naming convention of the site street in order to make searches easier.
- QR Code: This is a unique string that is generated when a site location is created. This is the string used to create QR codes that you can display prominently at your site location for people to use if/ when you use the mobile integration for TIKS VMS.
-
Configurations: This shows at a glance
the configurations set for the site, the max configurations it will show will be; Induction (?? Months), Print, Email and Photo. If these are in use, they will be shown with a coloured tick for that site. - Actions: There are 5 different actions you can select from that will be explained in the next section
- Add Site: If you would like to add a new site to TIKS VMS, on the Site Location select the coloured “Add Site” button in the top right-hand corner, this will open up an Add Location pop-up. This will be explained further in a later. section.
- Search: If you’d like to find a specific site in the Site Location page you can use this function. Simply select the coloured magnifying icon and a slightly translucent black bar will appear along the top of the page. You just start typing the desired search text and hit enter to complete your search.
Sites Actions
- Inductions: If you select this button, you can view and edit the induction slides for that site. Depending on how your site is set up, you will be able to see 3 tabs on the inductions page; Visitor, Staff and Contractor. You can have different induction content for each of these different user types and it will be shown to them when signing in.
- Schedule: This button allows you to leave a message on the tablet/kiosk for times when the desk is unmanned. It allows you to schedule an instruction message on the screen.
- Switch: This function allows you to switch to the selected site (dependant on your permissions level). Once you have successfully switched you’ll see the site you’re logged into in the “Current Site” section and you’ll also see the site name appear in the top right-hand corner of the black bar.
- Edit: This is the naming of the site, generally companies use the naming convention of the site street in order to make searches easier.
- Delete: This will delete the Site Location.