TIKS VMS Records User Guide
This user guide covers the basic functions of the Records module within TIKS VMS.
- How to set up a Contractor Company and Individual Workers
- How you onboard a new Contractor Company (no Procore integration)
- How to onboard Individual Workers (no Procore integration)
- How to onboard a new Contractor Company (with Procore integration)
- How to onboard Individual Workers (with Procore integration)
- How to Set Up and Approve Requirements on Records
- How to Set Up Records for Contractor Companies
- How to Set Up Records for Individual Workers
- How to Approve or Reject Records
- How to Set Up Inductions for Site Locations
- How to Become Approved
- How to Use the Visitor App
How to set up a Contractor Company and Individual Workers
How you onboard a new Contractor Company (no Procore integration)
Inviting a new Contracting Company (no Procore)
The instructions below are to manually invite a contracting company to onboard. When using the Procore integration, the companies you already have on Procore will automatically be added to TIKS Records. However, you will have to manually invite an Administrator for each of the synced companies from Procore.
1. Log into the admin portal
2. Tap on the "Records" button
Next, to invite a Contracting Company you will need to fill in the following fields:
Step 1: Add the Company name
Step 2: Add the Company Admin user's Full Name
Step 3:Add their admin user's email address
Step 4: Add their admin user's mobile number
Step 5: Select which active sites this Company can work on.
Now tap on the "Invite Company" to finalise the registration. The Admin user for this account will now be notified by email.

How to onboard Individual Workers (no Procore integration)
The instructions below are to manually invite an Individual Worker to onboard.
When using the Procore integration, the companies you already have on Procore will automatically be added to TIKS as will any users under those companies. However, you will have to manually select an Administrator for each of the synced users from Procore by editing their Role (Pencil icon).
1. Log into the admin portal
2. Tap on the "Records" button
3. Tap on the Contracting Company you want to invite Individual Workers from
Next, to invite an Individual Worker you will need to fill in the following fields:
Step 1: Add the user's Full Name
Step 2: Add their email address
Step 3: Add their mobile number
Step 4: Select which active sites this users can work on.
Now tap on the "Invite Individual" button to finalise the registration. The Admin user for this account will now be notified by email.
How to onboard a new Contractor Company (with Procore integration)
When TIKS is integrated with Procore, all companies in that project's Directory will come across to TIKS under the Records tile.
Due to the integration, Contractors Companies MUST be invited to your project in Procore first. Once the new company is added, it will be synced and appear in TIKS under the Records tile.
Contractor Companies cannot be added directly into TIKS when Procore integration is turned on.
How to onboard Individual Workers (with Procore integration)
When TIKS is integrated with Procore, all companies in that project's Directory will come across to TIKS under the Records tile. In addition, all users under those companies in the Directory will also be brought across to TIKS under their relevant companies.
Due to the integration, Contractors Companies MUST be invited to your project in Procore first. Once the new company is added, it will be synced and appear in TIKS under the Records tile. However, Individual Workers may be added manually directly into TIKS, as users on Procore may not necessarily attend site to perform work.
When Individual Workers are added under Contractor Companies, their time on site will also be tallied up and added to Site Diary/Manpower on Procore. The Individual Worker's profile created in TIKS will not be shown on Procore.
Contractor Companies cannot be added directly into TIKS when Procore integration is turned on.
How to Set Up and Approve Requirements on Records
How to Set Up Records for Contractor Companies
How to Set Up Records for your Contracting Companies
1. Log into the admin portal
2. Tap on the "Records" button

Step 1: Tap on the "Records Type Settings"

Step 2: Tap on the "Add Records Type"

Step 3: Give this record a Name/title ie: "Safe Work Method Statements"

Step 4: To make this record available to the Contractor Company, please select "Company" in the Category dropdown list and select the options which are relevant for this record. Once done, please tap on the "Save" button.
Definition of options:
Active: Select this if you require the Company to fill/respond back to this record type. You must select this to have the record displayed in the users Records List - it activates the record for completion.
Document Upload: Select this if you require the company to upload a file to support this record type
Expire Required: Select this if you want to capture the expiry date of this record
Number/ID Required: Select this if you require to capture the record number, an example may be the Policy Number or Licence number
County Required: Select this if you want to capture the Country this record is recognised for
State Required: Select this if you want to capture the State this record is recognised for
Approval Required: Select this if you wish to review and approve the record captured. If you do not need to review/verify this record, please leave this option un-checked
Worker Sign Off Required: Select this option if you would like the Contractor Worker to acknowledge that they have viewed the information the Company has submitted against this record

How to Set Up Records for Individual Workers
1. Log into the admin portal
2. Tap on the "Records" button

Step 1: Tap on the "Records Type Settings"

Step 2: Tap on the "Add Records Type"

Step 3: Give this record a Name/title ie: "Safe Work Method Statements"

Step 4: To make this record available to the Contractor Company, please select "Individual" in the Category dropdown list and select the options which are relevant for this record.
Definition of options:
Active: Select this if you require the Company to fill/respond back to this record type. You must select this to have the record displayed in the users Records List - it activates the record for completion.
Document Upload: Select this if you require the company to upload a file to support this record type
Expire Required: Select this if you want to capture the expiry date of this record
Number/ID Required: Select this if you require to capture the record number, an example may be the Policy Number or Licence number
County Required: Select this if you want to capture the Country this record is recognised for
State Required: Select this if you want to capture the State this record is recognised for
Approval Required: Select this if you wish to review and approve the record captured. If you do not need to review/verify this record, please leave this option un-checked
Step 5: Select which site this worker can work on in the check-box options available: Once done, please tap on the "Save" button.

How to Approve or Reject Records
Review Records
1. Log into the admin portal
2. Tap on the "Records" button

Step 1: Tap on the search icon and type in the Company you wish to review. Alternatively, you can scroll down the page until you find that Company.

Step 2: To view the records for this Company, tap on the "View Records" agains the company listing

Step 3: You will now see a list of records submitted by this company, to view documents that may have been uploaded, tap on the download document icon

Step 4: To approve this record, tap on the "Approve" button. This will also allow you to add any comments you wish the Contractor Company Admin to see. Once approved, this record tile will go green.
To Reject this record, simply tap on the "Reject" button and add notes to help your Contractor understand what is needed for this record.

How to Set Up Inductions for Site Locations
Site Locations
Site locations can be added manually by clicking Add Site. This is typically used when TIKS is used as a standalone package, not integrated to 3rd party applications.
Site Locations will be brought across to TIKS automatically if Procore integration is being used.
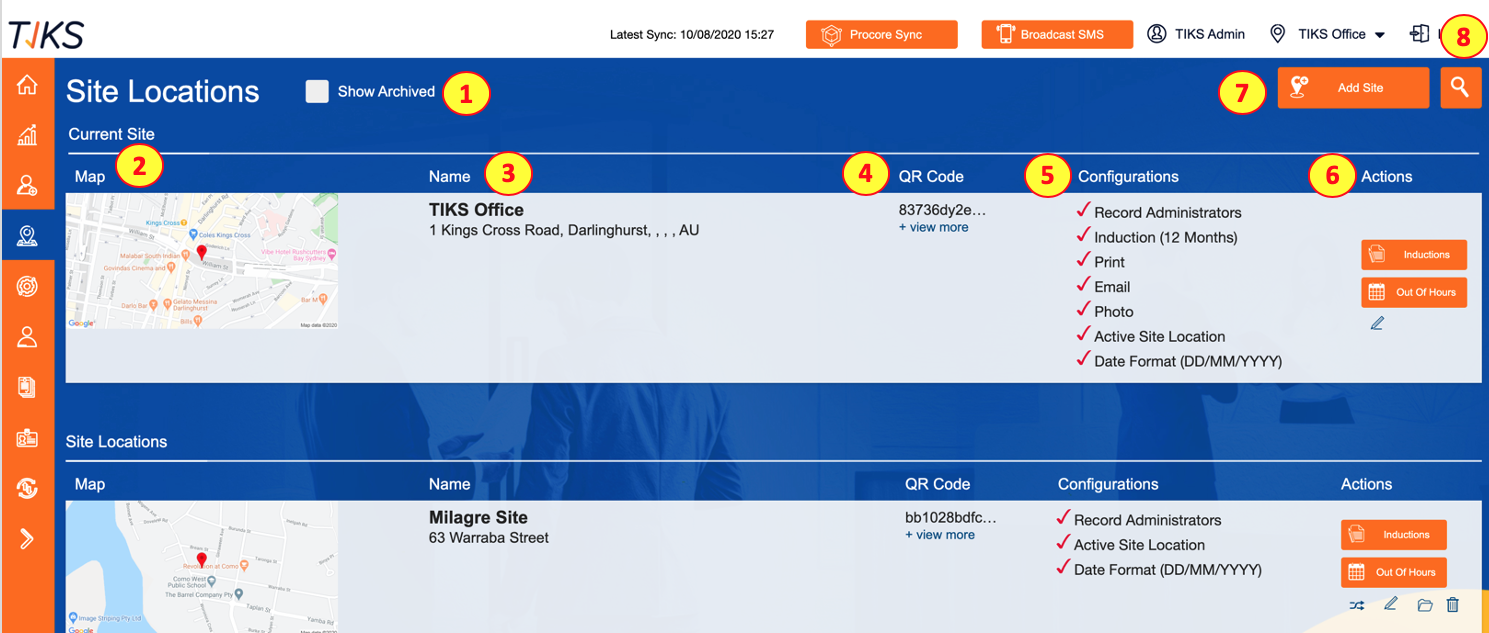
- Site Locations: This section shows a list of all of the site locations also available to switch to. This also includes all of the same details as the Current Site which will be explained.
- Map: This shows the map that is generated using a Google maps API from the input address.
- Name: This is the naming of the site, generally companies use the naming convention of the site street in order to make searches easier.
- QR Code: This is a unique string that is generated when a site location is created. This is the string used to create QR codes that you can display prominently at your site location for people to use if/ when you use the mobile integration for TIKS VMS.
-
Configurations: This shows at a glance
the configurations set for the site, the max configurations it will show will be; Induction (?? Months), Print, Email and Photo. If these are in use, they will be shown with a coloured tick for that site. - Actions: There are 5 different actions you can select from that will be explained in the next section
- Add Site: If you would like to add a new site to TIKS VMS, on the Site Location select the coloured “Add Site” button in the top right-hand corner, this will open up an Add Location pop-up. This will be explained further in a later. section.
- Search: If you’d like to find a specific site in the Site Location page you can use this function. Simply select the coloured magnifying icon and a slightly translucent black bar will appear along the top of the page. You just start typing the desired search text and hit enter to complete your search.
Sites Actions
- Inductions: If you select this button, you can view and edit the induction slides for that site. Depending on how your site is set up, you will be able to see 3 tabs on the inductions page; Visitor, Staff and Contractor. You can have different induction content for each of these different user types and it will be shown to them when signing in.
- Schedule: This button allows you to leave a message on the tablet/kiosk for times when the desk is unmanned. It allows you to schedule an instruction message on the screen.
- Switch: This function allows you to switch to the selected site (dependant on your permissions level). Once you have successfully switched you’ll see the site you’re logged into in the “Current Site” section and you’ll also see the site name appear in the top right-hand corner of the black bar.
- Edit: This is the naming of the site, generally companies use the naming convention of the site street in order to make searches easier.
- Delete: This will delete the Site Location.
How to Become Approved
Steps to Becoming Approved
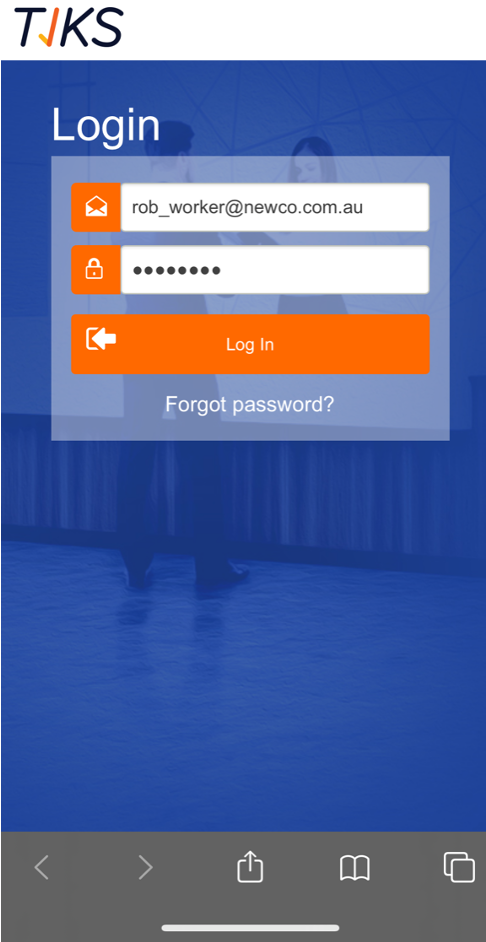
1. As an Individual Worker (known as Individual in the system), you will receive a welcome email advising you of your username and temporary password. The email sender is no-reply@tiks.com.au . If you cannot find the email in your Inbox, please check your Junk Mail folders, as your email provider may not recognise the sender.
Use the 'Click here' link from the email that takes you to the online Portal.
2. This is the login page for the online Portal. Use the username and password from the welcome email to login to the online Portal.
3. Once you have logged in, you will see the screen below with 2 tiles: Profile and Records. To complete your requirements and submit your records for approval, tap on Records. Tap on Profile if you would like to change your password from the one provided in the email.

4. You will be shown your company's status, in this example New Co is Approved. Tap on View Individuals to see your status. If you are a Company Administrator, you will have a View Records button next to View Individuals; tap in View Records and go to step 7 below to complete your company's records.

5. You will be shown your individual status, in this example Rob Worker is Pending Approval. You may have to complete an online induction, depending on the site requirements. Tap on Site Locations Induction to see your inductions. Tap on the little arrow on the right-hand side of the blue rectangle to play the induction (in this example, TIKS Office).

Once you tap on the Induction tile, the induction will play. You will need to watch the induction to the end of the presentation, by tapping on Next until you get to the end where you will be shown an Accept button.

You may also be asked to review and acknowledge a policy. If this is required, the screen below will be shown immediately after you complete your induction. Tap on Acknowledge once completed.

6. You will be taken back to the screen below, once you complete your induction and policies. Tap on View Records to complete your records.

7. Once you tap on View Records on the previous screen, you will be shown the records you need to complete and submit for approval. The example below shows 3 records: one record is Pending Approval (it has been completed and submitted for approval, but not yet approved) and two records are Pending (they have not been completed yet). Once records are completed and approved by Admin, they will turn Approved (green).

8. To complete a record, tap on the Pencil Icon, which will open the form below for you to fill out. You will need to fill out all fields shown in the form, and sometimes you will need to provide evidence in the form of an attachment.

If you are completing your records from a mobile device, you will be able to add evidence from your photo library, take a new photo directly or browse your files to find the correct attachment as shown below.

Once you have completed the form and attached your evidence, you will need to hit Save to submit the record for approval. If you believe this requirement does not apply to you (for example, you don't need a licence to perform your trade), you may select Not Applicable without filling out the form.

9. Once you have completed each record on your list, all your records will be in Pending Approval status until approved by Admin.

10. Once all of your records have been approved, your overall status to access your company site will be Approved (green) as shown below. If you are required to complete an online induction, you must also compete your induction before you come to site.

In addition, you are now able to use the Visitor app to gain access to site, by scanning the QR code from your app Profile via the turnstile.
How to Use the Visitor App
Downloading and Launching the App
The Visitor App will only be useful to you, once you have been approved as an Individual AND your company has also been approved. See the How to Become Approved chapter for details on becoming approved to access site.
1. Go to the Apple App Store (iPhones) or Google Play Store (Android) and search for Company Visitor. The App icon is shown below.
2. Download the App to your mobile device.
3. Once you have been approved, you will receive an email titled Successful Contractor Registration. Please follow the instructions in the email to launch the app, by tapping on the Click Here to launch the app tile within the email. See example email below.
4. Once you tap on that tile, the app will launch and log you in.

5. You are now ready to use the QR code from your app Profile to access site, by scanning it via the turnstile. This will sign you into site, and the appropriate staff member will be alerted of your arrival. At the end of your work day, scanning your QR code via the turnstile will sign you out of site.