Setup Procedure Once Hardware Arrive on Site
This setup is to be done via the Tablet over TeamViewer
- Remote into the correct device using TeamViewer - ensure that you know the site/location
- Ask client to connect the tablet to the WiFi
Wireless setup for the printer
- Setup the brother QL-810W printer.
- Ask the client to plug in the grey USB cable from the printer to the surface Pro USB slot
- Go to : https://support.brother.com/g/b/downloadtop.aspx?c=au&lang=en&prod=lpql810weas
- Double click the video below the setup
- Once the setup has been completed and set up wirelessly, the USB can be unplugged from the Surface Pro and plug in the image scanner into the USB slot of the Surface Pro. The client can re-assemble the hardware back inside the case.
- Open up settings in the Windows icon on the Taskbar, once in settings go to Devices, then Printer and Scanners.

-
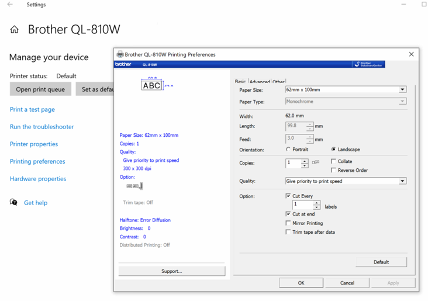
Printers and Scanners - this is where you will find the printer you just added in the above image, click on the printer and click on 'printer queue' and 'set as default printer'.

- Close this down then click on 'Manager' once in there click on 'System Preferences' on the left-had side in here you will need to change the paper roll size at the top right-hand side to (6mcm x 100mm). Printer is now setup, you may close all windows down.
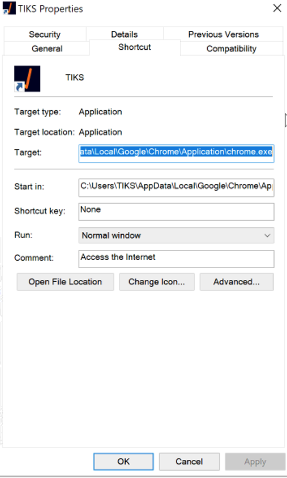
- Right click on the TIKS icon in the middle of the page, once you have right clicked go down to 'properties'. In the Target Field highlighted below, after .exe you will need to put the location ID in. use the below string and change the client ame at the start and the location number at the end to match the location in the admin portal. This number can be found in the admin portal by hovering over the induction button.
- Note - make sure there is a space after exe when pasting the below sting!
-

-
- Make sure you click 'Apply' then 'Ok'
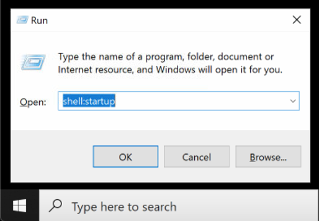
- On he windows taskbar at the bottom of the screen you will see a search field, inside the search field you will need to use your keyboard and click 'command' and the letter 'R' at the same time to open up 'Run' and once the 'Run' command is open you will need to type in 'shell:startup'
-
- Once this opens up you will need to copy the TIKS icon on the front screen and paste it into the startup folder. You will also need to do the same with 'Main' from the silent print folder in 'C' drive. This is found at the bottom of the windows taskbar, there is a yellow folder you will need to open.
-

- Inside the folder on the left-hand side you will see 'C' drive folder, once this is open you will find 'Silent Print' open this folder and copy 'Main' then paste it into the same folder you pasted the TIKS icon. Once both files are pasted into the startup folder you will need to add numerical value to the file name, as shown below.
-

- Once this is all down, restart the Surface Pro and ensure that the two pasted items in startup items load correctly. Once the device restarts, the VMS page should be the only screen you see once you remote back into the device.