TIKS Assure Manual
Onboarding: Technician, Worker, Sub-Contractor
Introduction
All contractors (technicians, workers, and subcontractors) performing works can use this platform for various clients.
The Contractor Company’s Administrator will invite all of their technicians, workers and subcontractors to TIKS Assure if integration to a Contractor Management System does not exist
Technicians, workers and subcontractors can then register in TIKS Assure and enter their competencies.
When a work order is raised by your Operations Centre, it is sent directly to the contractor company’s Administrator Portal. The Vendor Administrator will allocate the job to a qualified registered technician/contractor worker. The job is accepted through the mobile app by the technician/contractor worker, who completes the job using the app. If a technician’s qualifications are expired, they will not be able to be allocated the work by the Vendor Administrator until they have upload current qualifications.
Technician Invitation
You will receive an email inviting you to register in TIKS Assure from your Vendor Administrator. You will need to use a computer to register and click on the link in the email to complete your registration.
Technician Registration
If an integration to a (CMS) platform does not exits, a technician/contractor worker will be requested to enter their name and competency information for the work they perform, along with the issue date or expiry date listed on the competency. Competencies include:
- licences
- qualifications
- induction records
- certificates, e.g. white card (construction), first aid etc.
- checks, e.g. police check, working with children etc.
- any other records required by the client or by your trade
Once your competencies have been added, you will see them listed under ‘Active Competencies’. Please ensure all relevant licences, certificates and qualifications are current and have been provided to your employer/contracting company - then click ‘Register’.
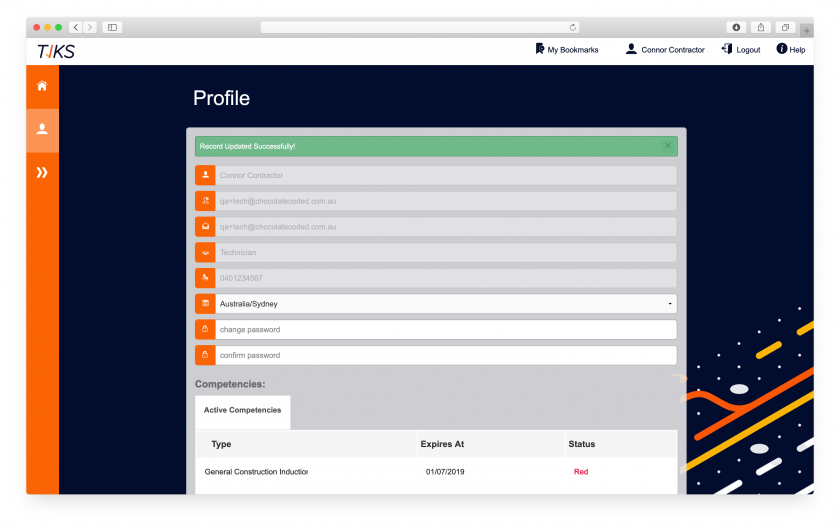
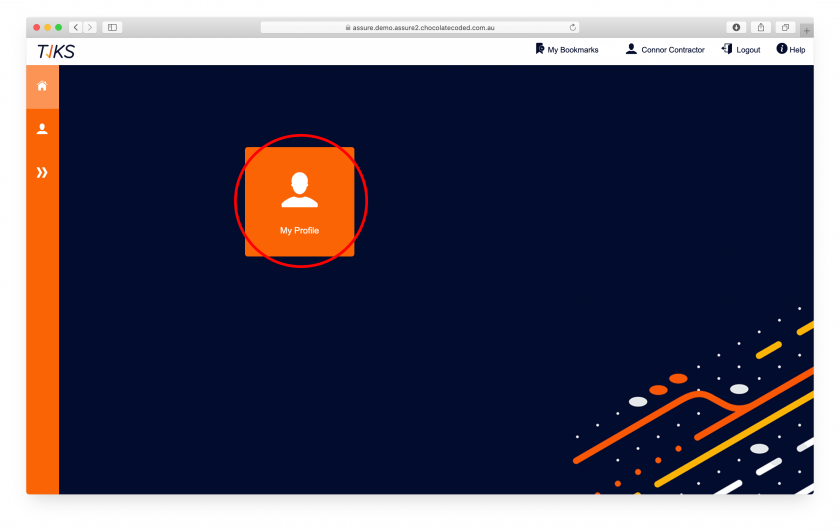
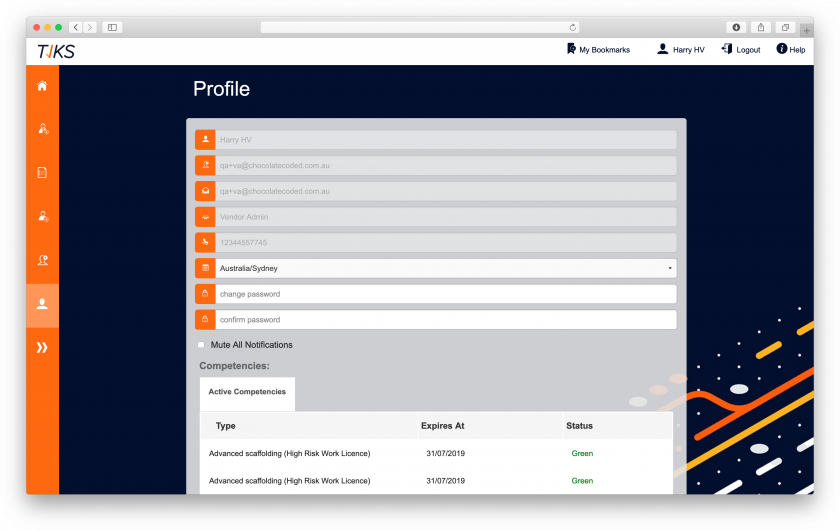
Updating your Profile
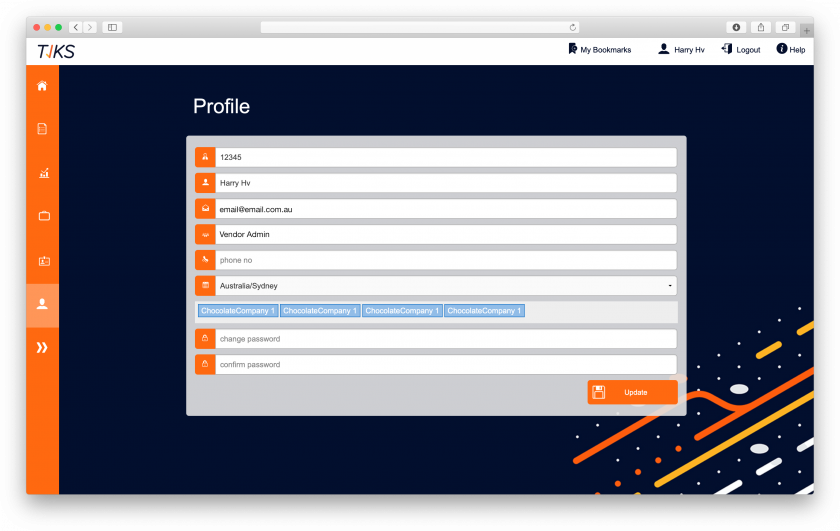
To update your personal information and competencies, log on the Contractor Portal on a computer (you cannot access this via the app). Use the same log in detail that you use for the app to log into the portal. Click on the icon ‘My Profile’. It is important to ensure your competencies are current or your Vendor Administrator will not be able to assign you work.
You can update:
- Name
- Phone Number
- Password
- Competencies
The mobile app
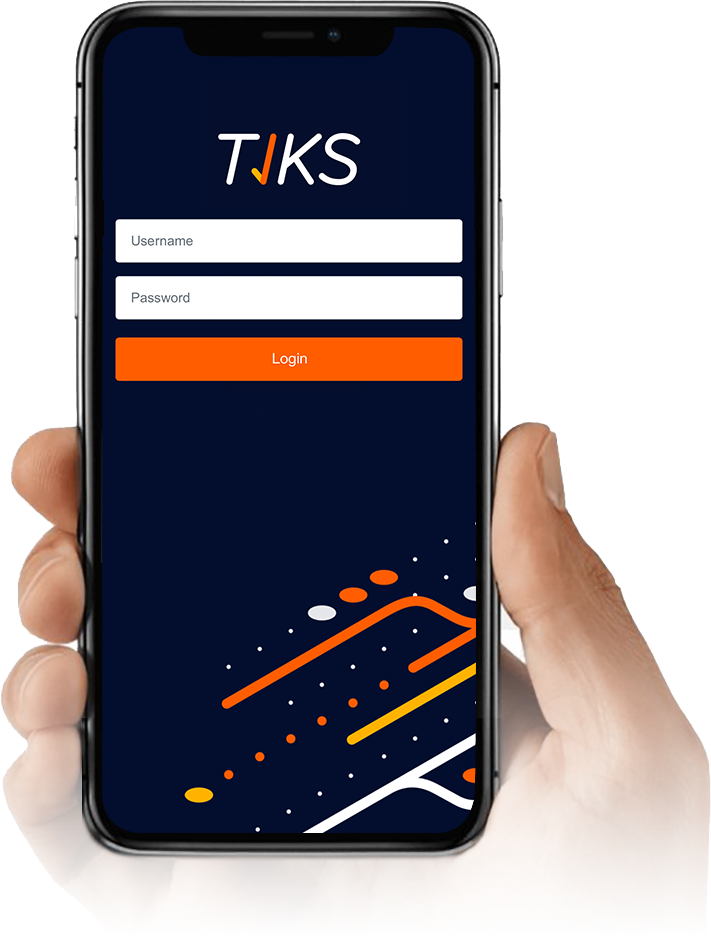
Go to the App Store or Google play and download the app. Once you have downloaded the app, click on the app to open and the following page will appear. Enter your Username and Password.
Notifications
If you receive a notification to allow the app to send you push notifications, select yes. You will need this to receive push notifications from the app. You can change notification settings at any time in your phone settings. You will receive notifications for the following:
- New work orders
- App updates
- PRA and Permit Approvals or Rejections
- Purchase Order approvals or rejections (If configured)
Receiving a Work Order
You will receive a push notification to your device when a new work order is assigned to you.
Please note that the push notification function is dependent on Apple and Android providers delivering these notifications to your device, rather than an app fault. To ensure you can receive push notifications, please check you have enabled push notifications on your device.

Accessing and Viewing Work Orders
Once you are logged into the app, you will see two tiles: Check In/Out and Work Orders
Check In/Out
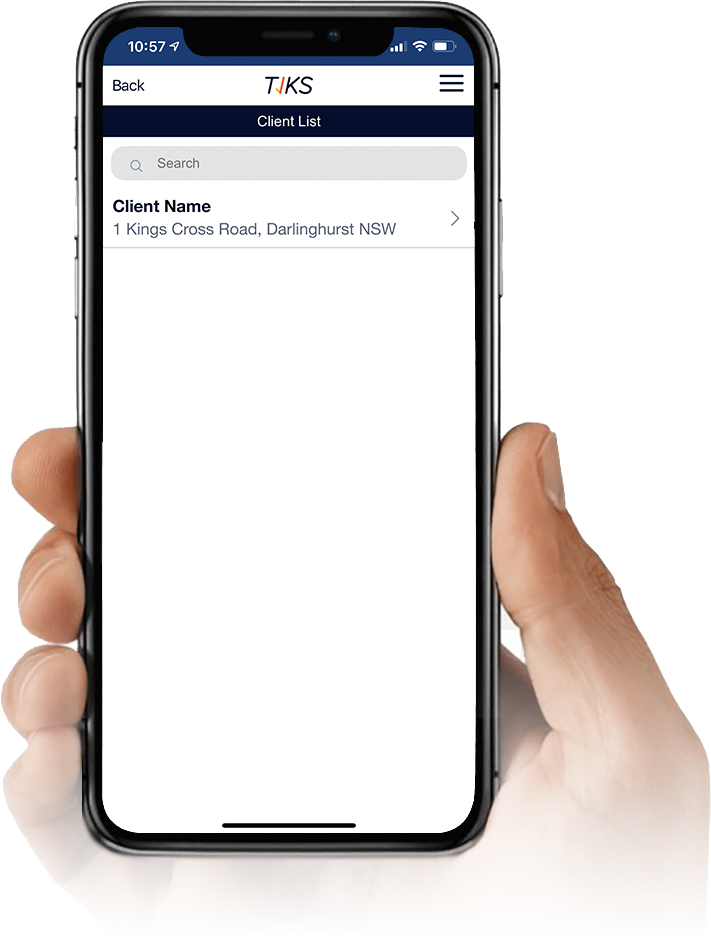
Check In/Out displays all work orders issued to your employer, whether they are assigned to you or not. This is the tile you will need to access work orders if you are working an on-call or afterhours shift. When selecting Check In/Out, you will be asked to scan a QR code or select from a list of clients to choose from. Scan or select the client. Then you will be presented with a list of sites with open work orders. Select the relevant site. Next you will see a list of available work orders for that site.
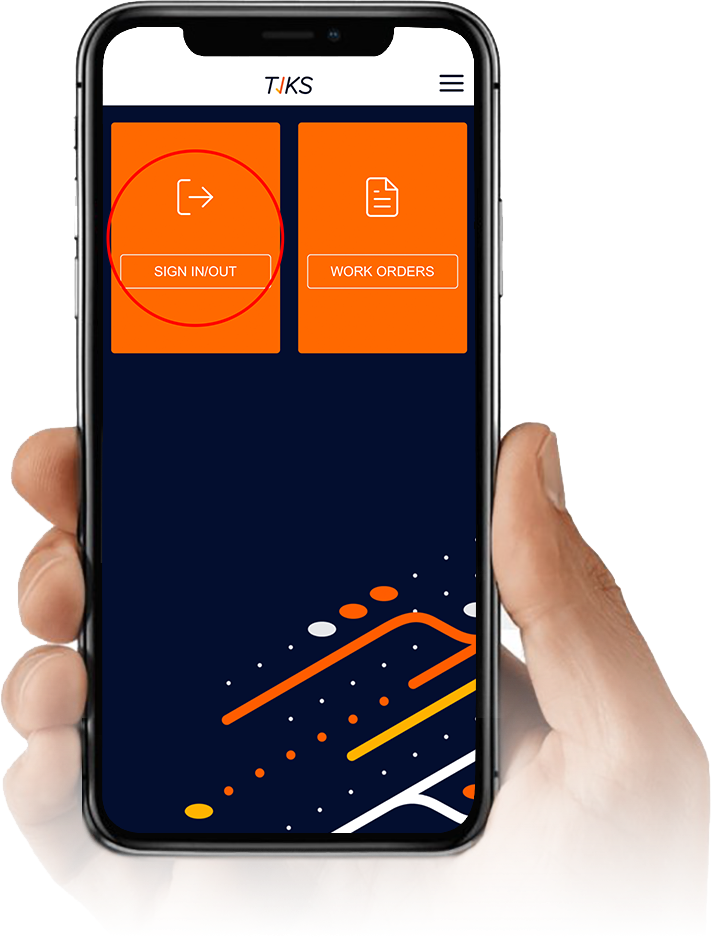
Work Orders
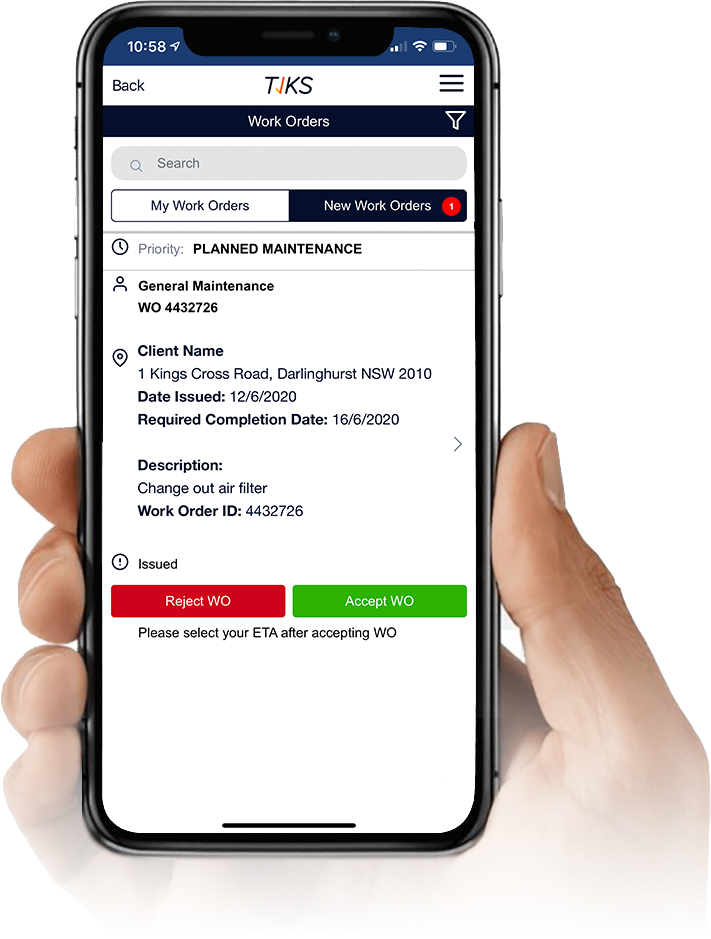
The Work Order tile has a list of Work Orders assigned to you by your Vendor Administrator. Select the work order to begin. If you have no work orders assigned to you this view will be blank

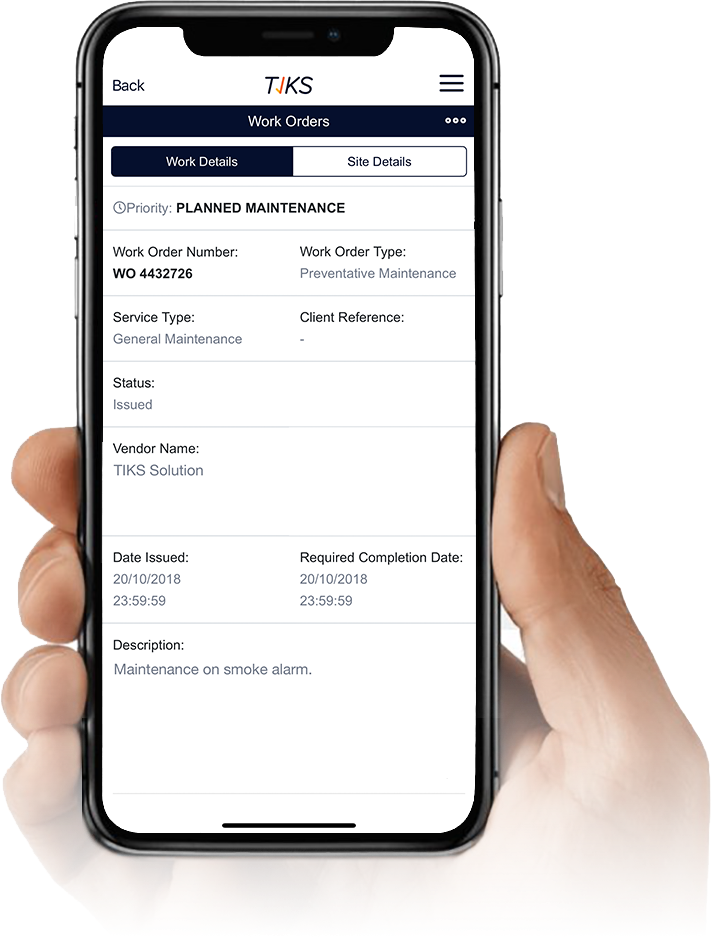
Work Details
You can now view the work order details including the Priority allocated to the job. The Work Details tab will show you the following information:
- Priority
- Work Order Number
- Work Order Type
- Service Type
- Client Reference
- PO Number
- Status
- Required Onsite
- Vendor Name Date Issued
- Completion Due
- Description
- Map of the location of the site
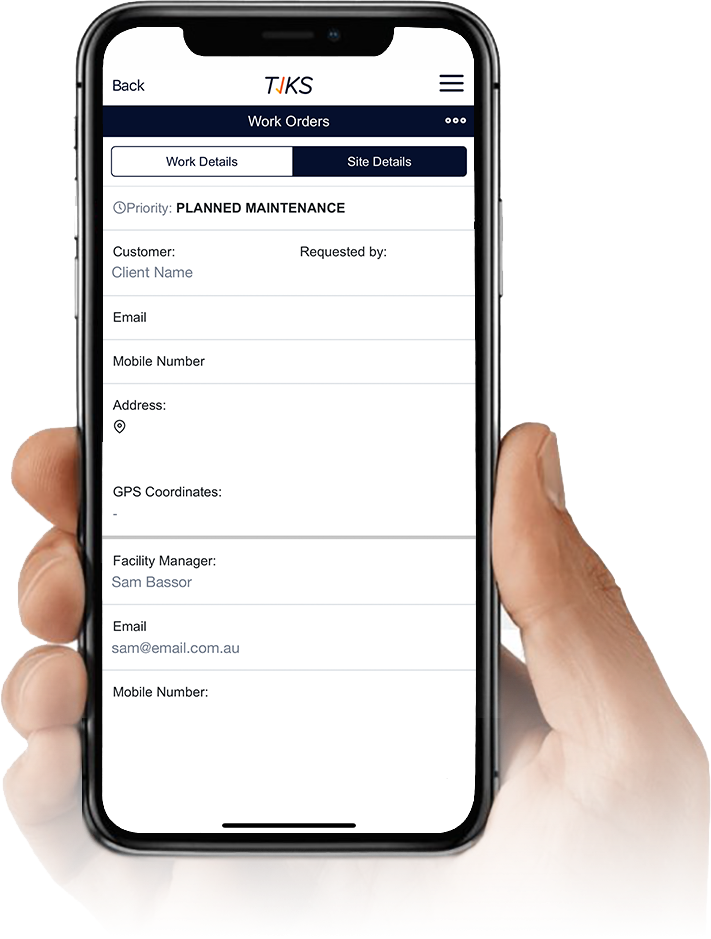
Site Details
When you switch to the Site Details tab, you will see the following information:
- Priority
- Customer
- Requested by
- Mobile Number
- Address
- GPS Coordinates
- Facility Manager
- Map of the location of the site
Once these details are checked, select check into site. This tells the system you are on site and ready to commence work.
Essential Site Information
Once checked in, the Essential Site Information will be displayed, showing client and site-specific information. Click I Agree to confirm understanding before you begin work.
Once you select I Agree, you will next need to complete a Pre-Risk Assessment.
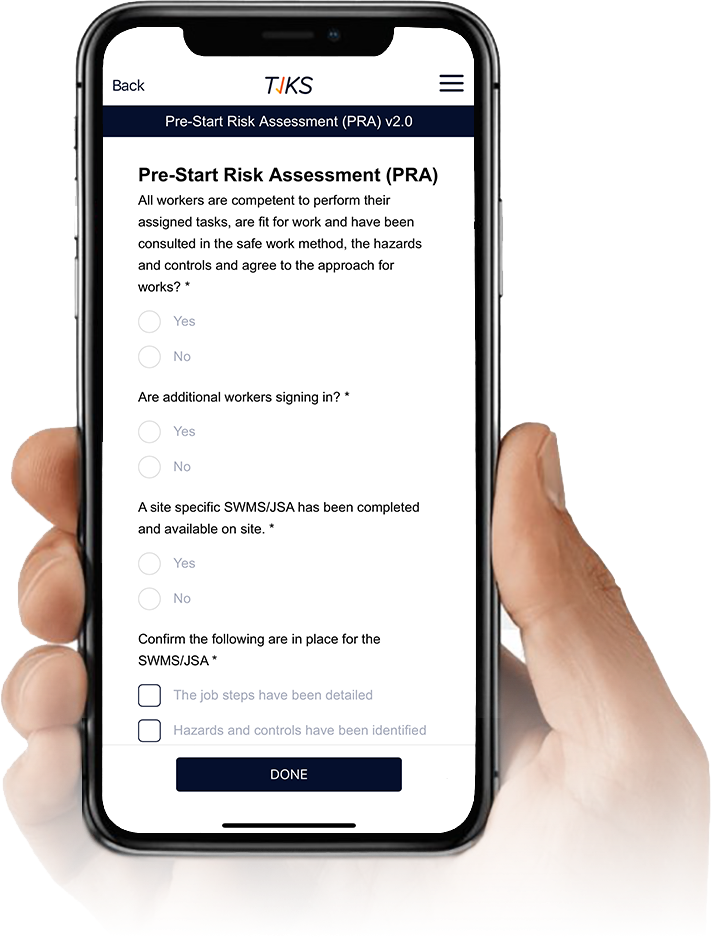
Pre-Start Risk Assessment and Permit to Work
The pre-start risk assessment verifies safe systems of work are in place, and identifies whether any permits to work are required. Note: The below example may not appear the same as the one you will be required to complete
Pre-Start Risk Assessment/Permit Approvals
Once the PRA/Permit is submitted, the work order status will read Awaiting Permit Approval. You will receive a notification when a PRA/permit has been declined or approved on your device (enable push notifications to receive notifications.)
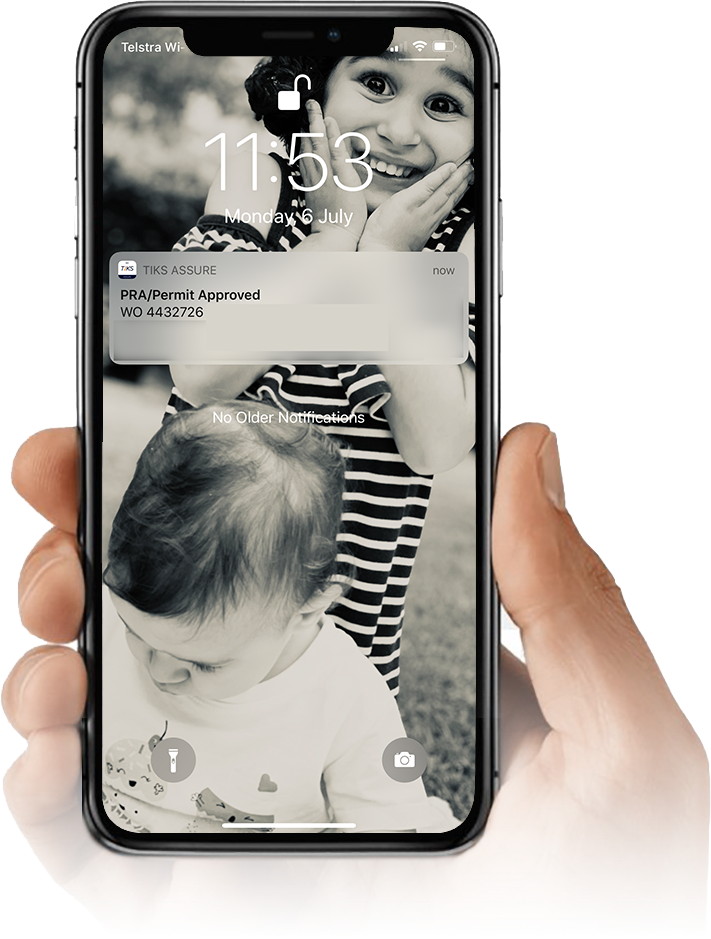
A push notification and email will notify you the PRA/Permit has been approved. Open the work order. If the work order status has not updated, swipe down to refresh the screen.
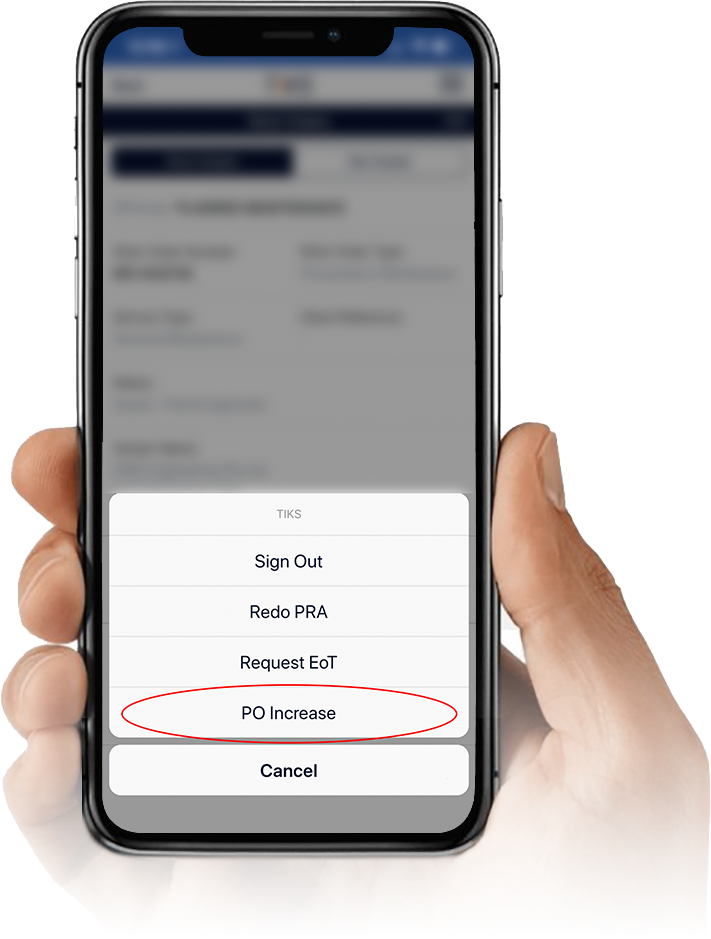
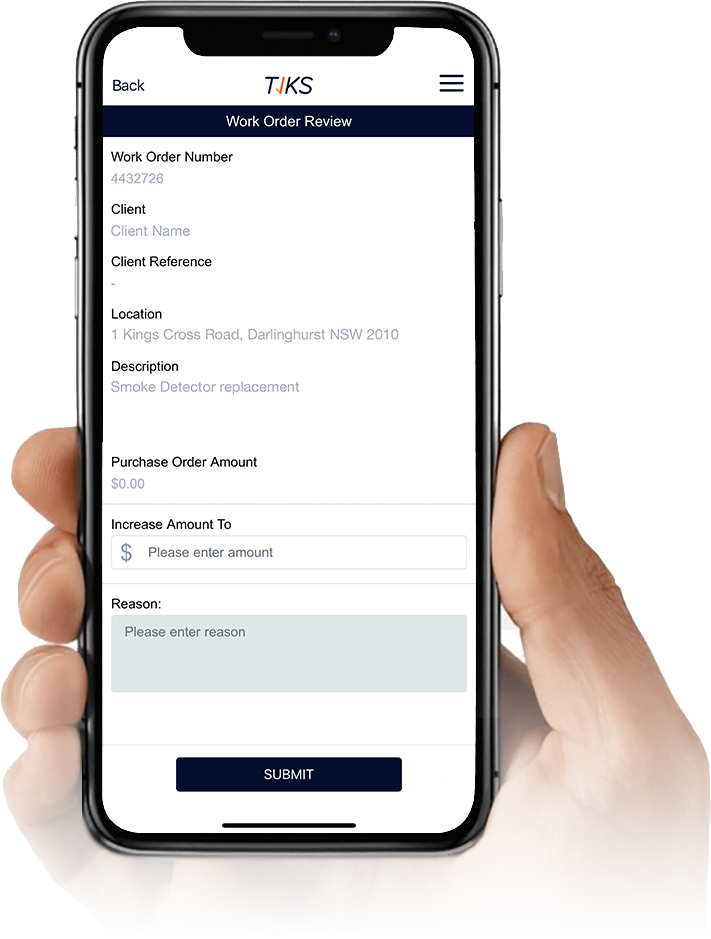
Work Order/Purchase Order Cost Increase
If works exceed the pre-approved PO amount, request an increase via the app. In the work order’s work details screen.
List the increase amount and the reason for the increase. Once complete select Submit. The request will be sent to the Site Manager, to review, approve or decline the request. During this, the work order status will be “Awaiting PO Increase”
Asset Capture Form
For certain types of work orders, you may be prompted to complete an asset capture form
Completing a Work Order
To complete a work order, compete the ‘Additional Findings’ close out screen. Select ‘Resolution Reasons’ from the drop-down list. Complete ‘Findings’ and ‘Action Taken’ fields. If Corrective Work, Hazards or Future Work has been identified, select and describe the issue and details.
View Competencies via the App
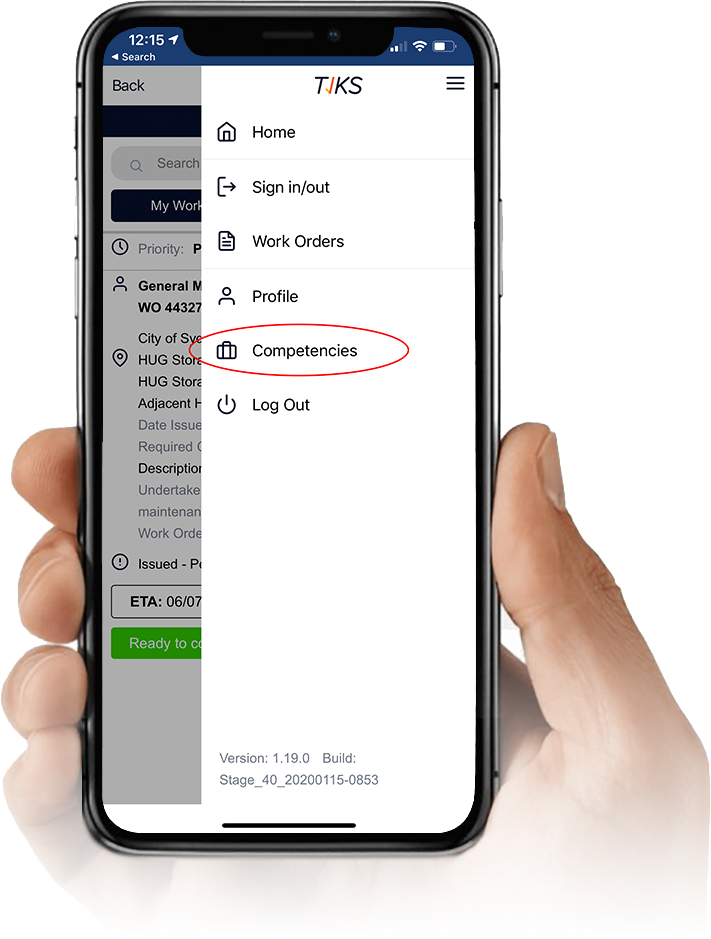
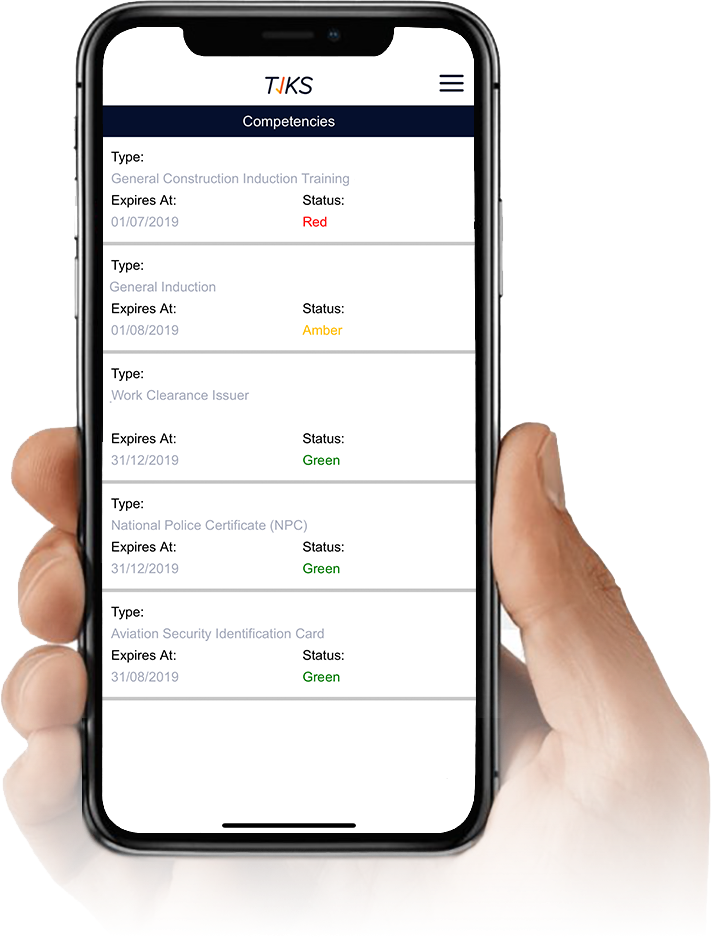
Sometimes when you are on site working on a job, the client may request to view your competencies. You are able to do this via the app. On the top right hand of the app, click on the three lines and tap on the ‘Competencies’ option from the list.
Vendor Administrator
Introduction
The Contractor Company’s Vendor Administrator will invite all their technicians, workers, and subcontractors to TIKS Assure. The technicians, workers and subcontractors then register in TIKS Assure and enter their competencies.
When the you raise a work order, it is sent directly to the contractor company’s TIKS Assure Contractor Portal, which is managed by the Vendor Administrator. The Vendor Administrator will allocate the job to a qualified registered technician. The job is accepted through the app by the technician, who completes the job using the app. If a technician’s qualifications are expired, they will not be able to be allocated the work by the Vendor Administrator until they upload current qualifications.
Vendor Administrator invited to TIKS Assure
You will be able to invite the Contractor Company Contact (Vendor Administrator) via email to register in TIKS Assure. You will need to use a computer or laptop to register. Once registered you can invite additional Vendor Administrators for your company, if required.
You will receive an email invitation, which contains attachments with further information. Click on the link in the email, which will take you to the Vendor Administrator Portal to complete your registration. At the registration screen, input contact phone details and create a password for your login.
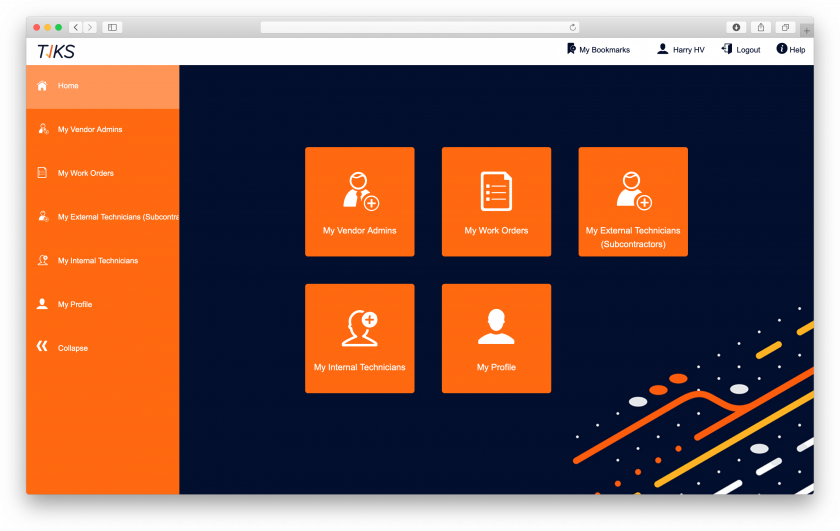
Overview Portal Navigation
Once you have logged into the Contractor Portal, you will be presented with the main screen.

You will see the following tiles:
- My Vendor Admins: Where you can invite additional administrators
- My Technicians/My External Technicians: Where you can invite technicians, workers and subcontractors
- My Work Orders: where you can view, accept and assign work orders to technicians
- My Profile: Where you can update your personal profile
On the left hand side bar there are several icons that contain the same links as the main tiles. If you click on the double arrows, it will expand the selection to view each available link:
Updating your Profile

You can update:
- Name
- Phone Number
- Password
- Elect to work in TIKS Assure as a technician
- Add competencies
Invite Additional Vendor Administrators
Your business may require more than one Vendor Administrator. The platform issues an invitation to one Vendor Administrator per company. Once the Vendor Administrator has registered in TIKS Assure they can invite more Vendor Admins for your business. Note that all Vendor Admins have the same access and views. Invite a Vendor Admin by clicking on the My Vendor Admins tab.
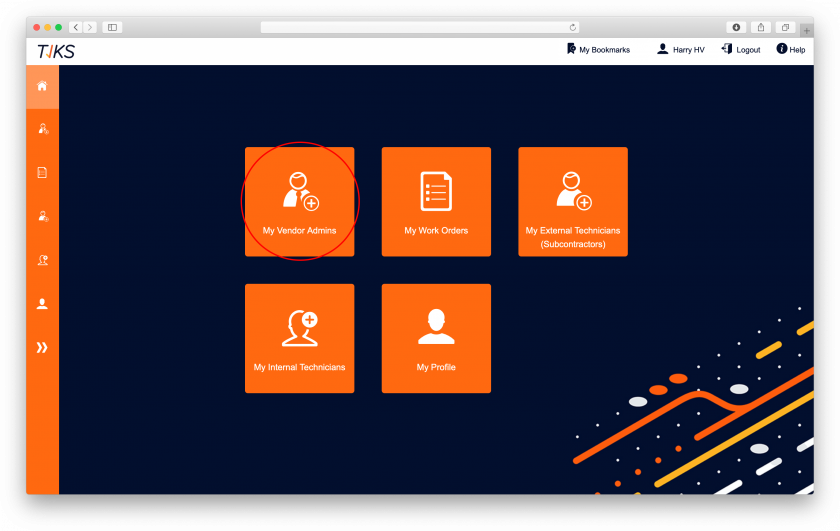
Add the vendor admin name and email address and select ‘invite user’.
Invite Technicians and Workers
To invite all your technicians and workers to TIKS Assure, click on My Technicians.

Select the "Add Workers" button an complete the registration form.
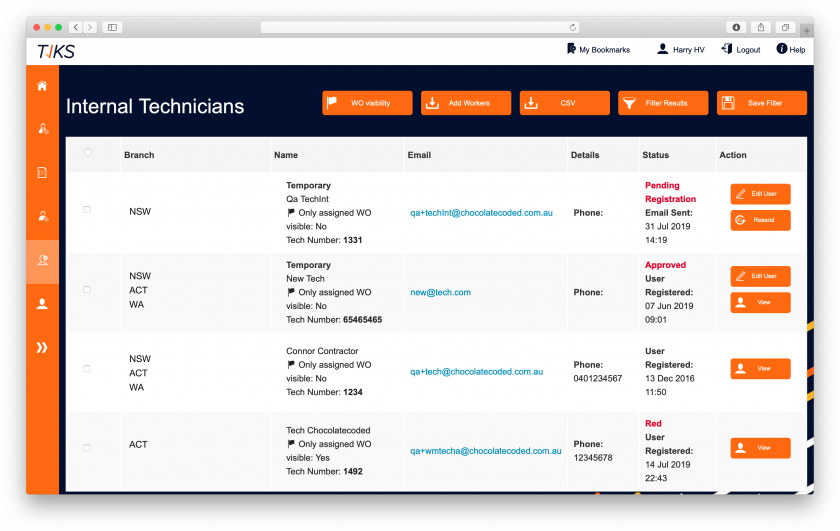
Review Competencies
Once a technician has uploaded their competencies, the vendor administrator reviews and approves them to enable the technicians to be allocated work. Click on the Review button next to the technician’s name.
Notification of Updated Competencies
When a technician updates their competencies, you will receive a notification to alert you to review the new competency.
Approving Technician and Worker Competencies
Once a technician is registered and has uploaded their qualifications, the Vendor Administrator must review and approve it to complete the technician’s registration. Go to My Technicians to view technicians with Approval Pending
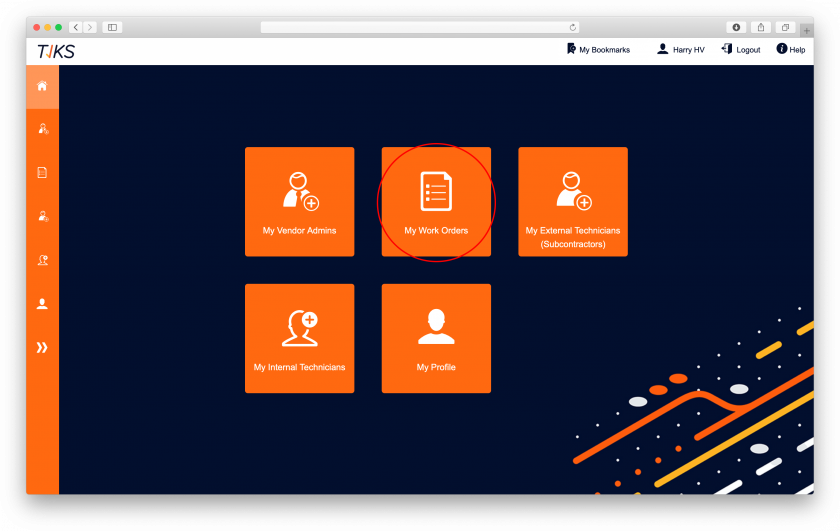
Manage Work Orders
To manage your work orders, click on the My Work Orders icon.
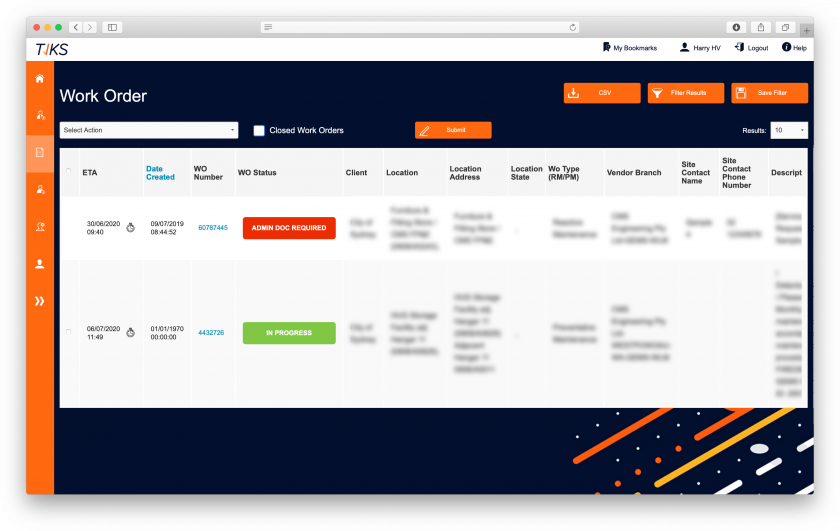
The Work Order screen main view:
Assign a Work Order to a Technician
Once a work order is accepted you can assign the work order to a technician. Only registered technicians or workers with up to date competencies can be allocated a work order. To assign a work order, select the work order:

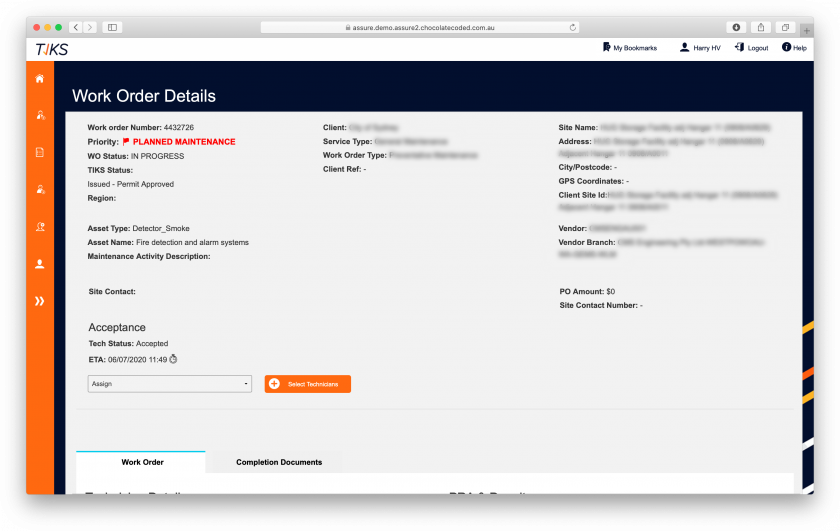
This will take you to the details screen:

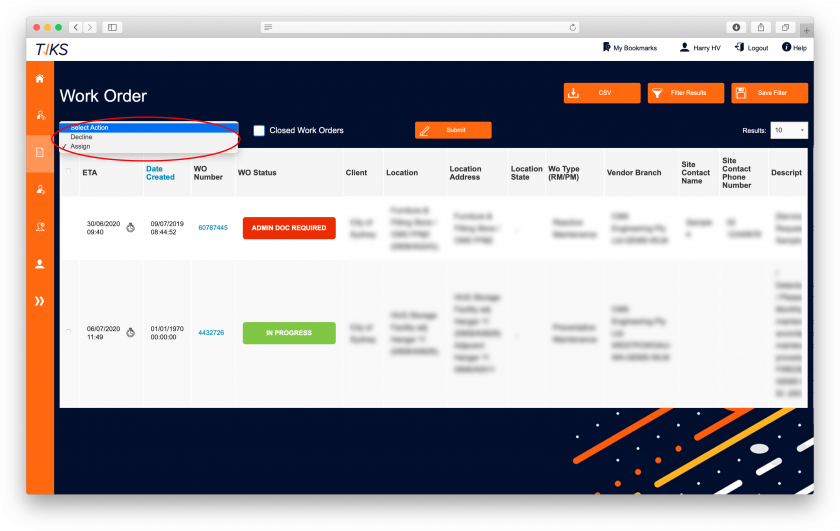
Click on Select Action and from the dropdown, select to Assign or Decline a work order.

When you select Assign, a new button will appear to Select Technicians. Click to select the technician to assign to the job.
A full list of your technicians will appear:
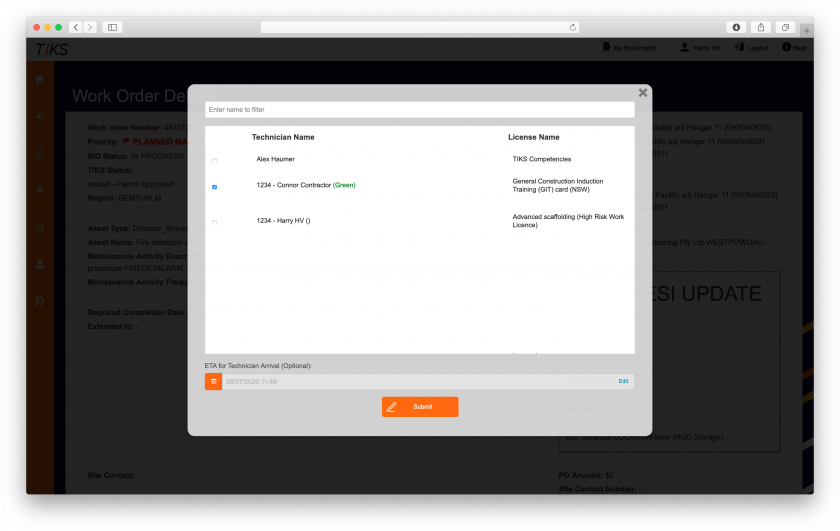
If you need to use a technician with an expired competency, they can update their details in real time, so you can approve their changes and allocate a work order immediately. Select the technician and click Submit to assign it to them. Once you have assigned a work order to a technician, it will appear on their app under My Work Orders.
Bulk Assigning Work Orders to Technicians
You can bulk assign a work order by Filtering by a client and selecting the work orders you would like to assign to one technician. You can assign a work to more than one registered technician by selecting the same work order and adding additional technicians.
Reassign a Work Order/Remove Technician from Work Order
If a technician cannot complete a work order, reassign it at any time by clicking on the work order to access the Work Order Details page. The technicians assigned to the Work Order will appear underneath Technician Details. To remove a technician, click on the bin icon next to their name
Add Additional Technicians to an Open Work Order
To add additional technicians at any stage of a work order, follow the instructions in Assign a Work Order to a Technician
Decline a Work Order
If you decline a work order, the response will be automatically sent to the Operations Centre to reallocate the work order to another Vendor. You can decline a work order by following the same steps as in Assign a Work Order, except choose Decline. You will need to select a reason to decline a work order.
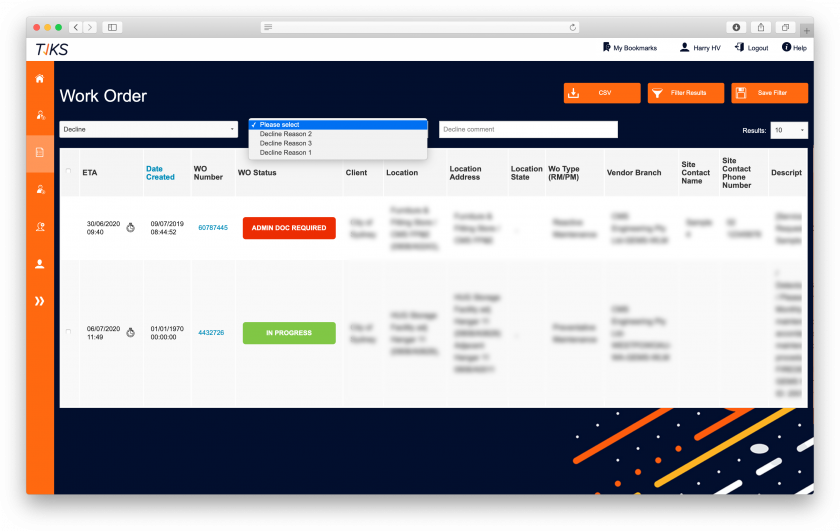
Once you have selected the reason for declining a work order, a comment box will populate to allow you to advise in detail why the works have been declined.
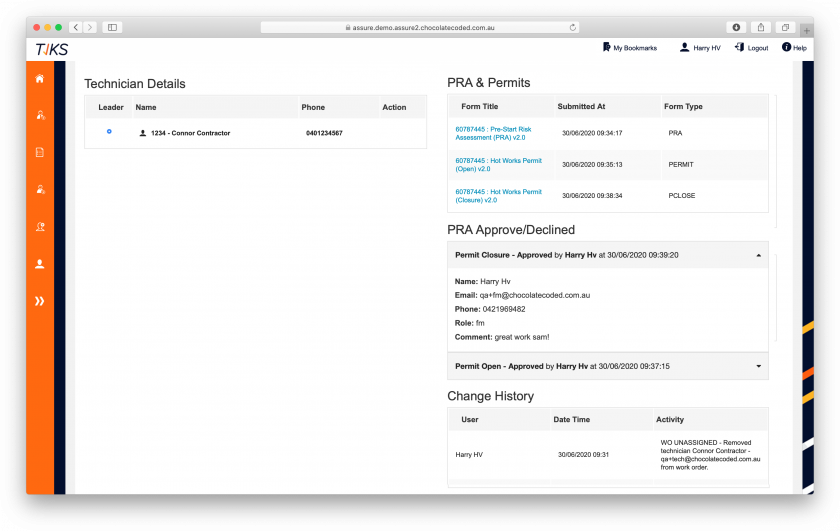
Work Order History
The work order history can be viewed in the detailed view of the work order. Click on the work order number. On the bottom right you can track its history including pre-start risk assessment and Permit submission.
When a work order is live, this field will be populated like the below example:
Bulk Closing Preventative Maintenance Work Orders
If you have multiple Preventative Maintenance Work Orders that are in status ‘Permit Approved’ or ‘No PRA Required’, you can close them in bulk using the ‘Bulk Update’ option in the ‘My Work Orders’ tile.
Once your results are loaded, select the check boxes next to the work orders that need to be closed out and select ‘Bulk Update’ from the Select Action drop down.
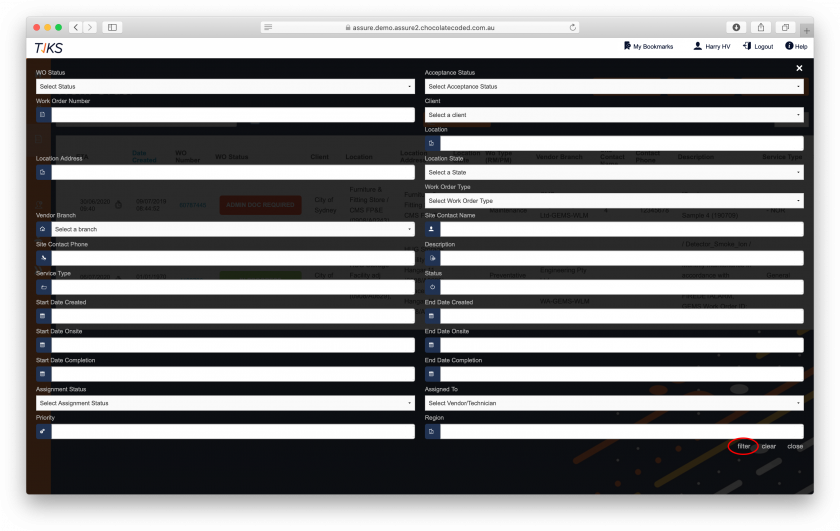
Using Filter Search
Filter Results allows you to find specific work orders, when you have chosen the categories to filter, click on Filter in the bottom left hand corner to filter to the results page.