Getting Set-Up
Getting set up as an Administrator
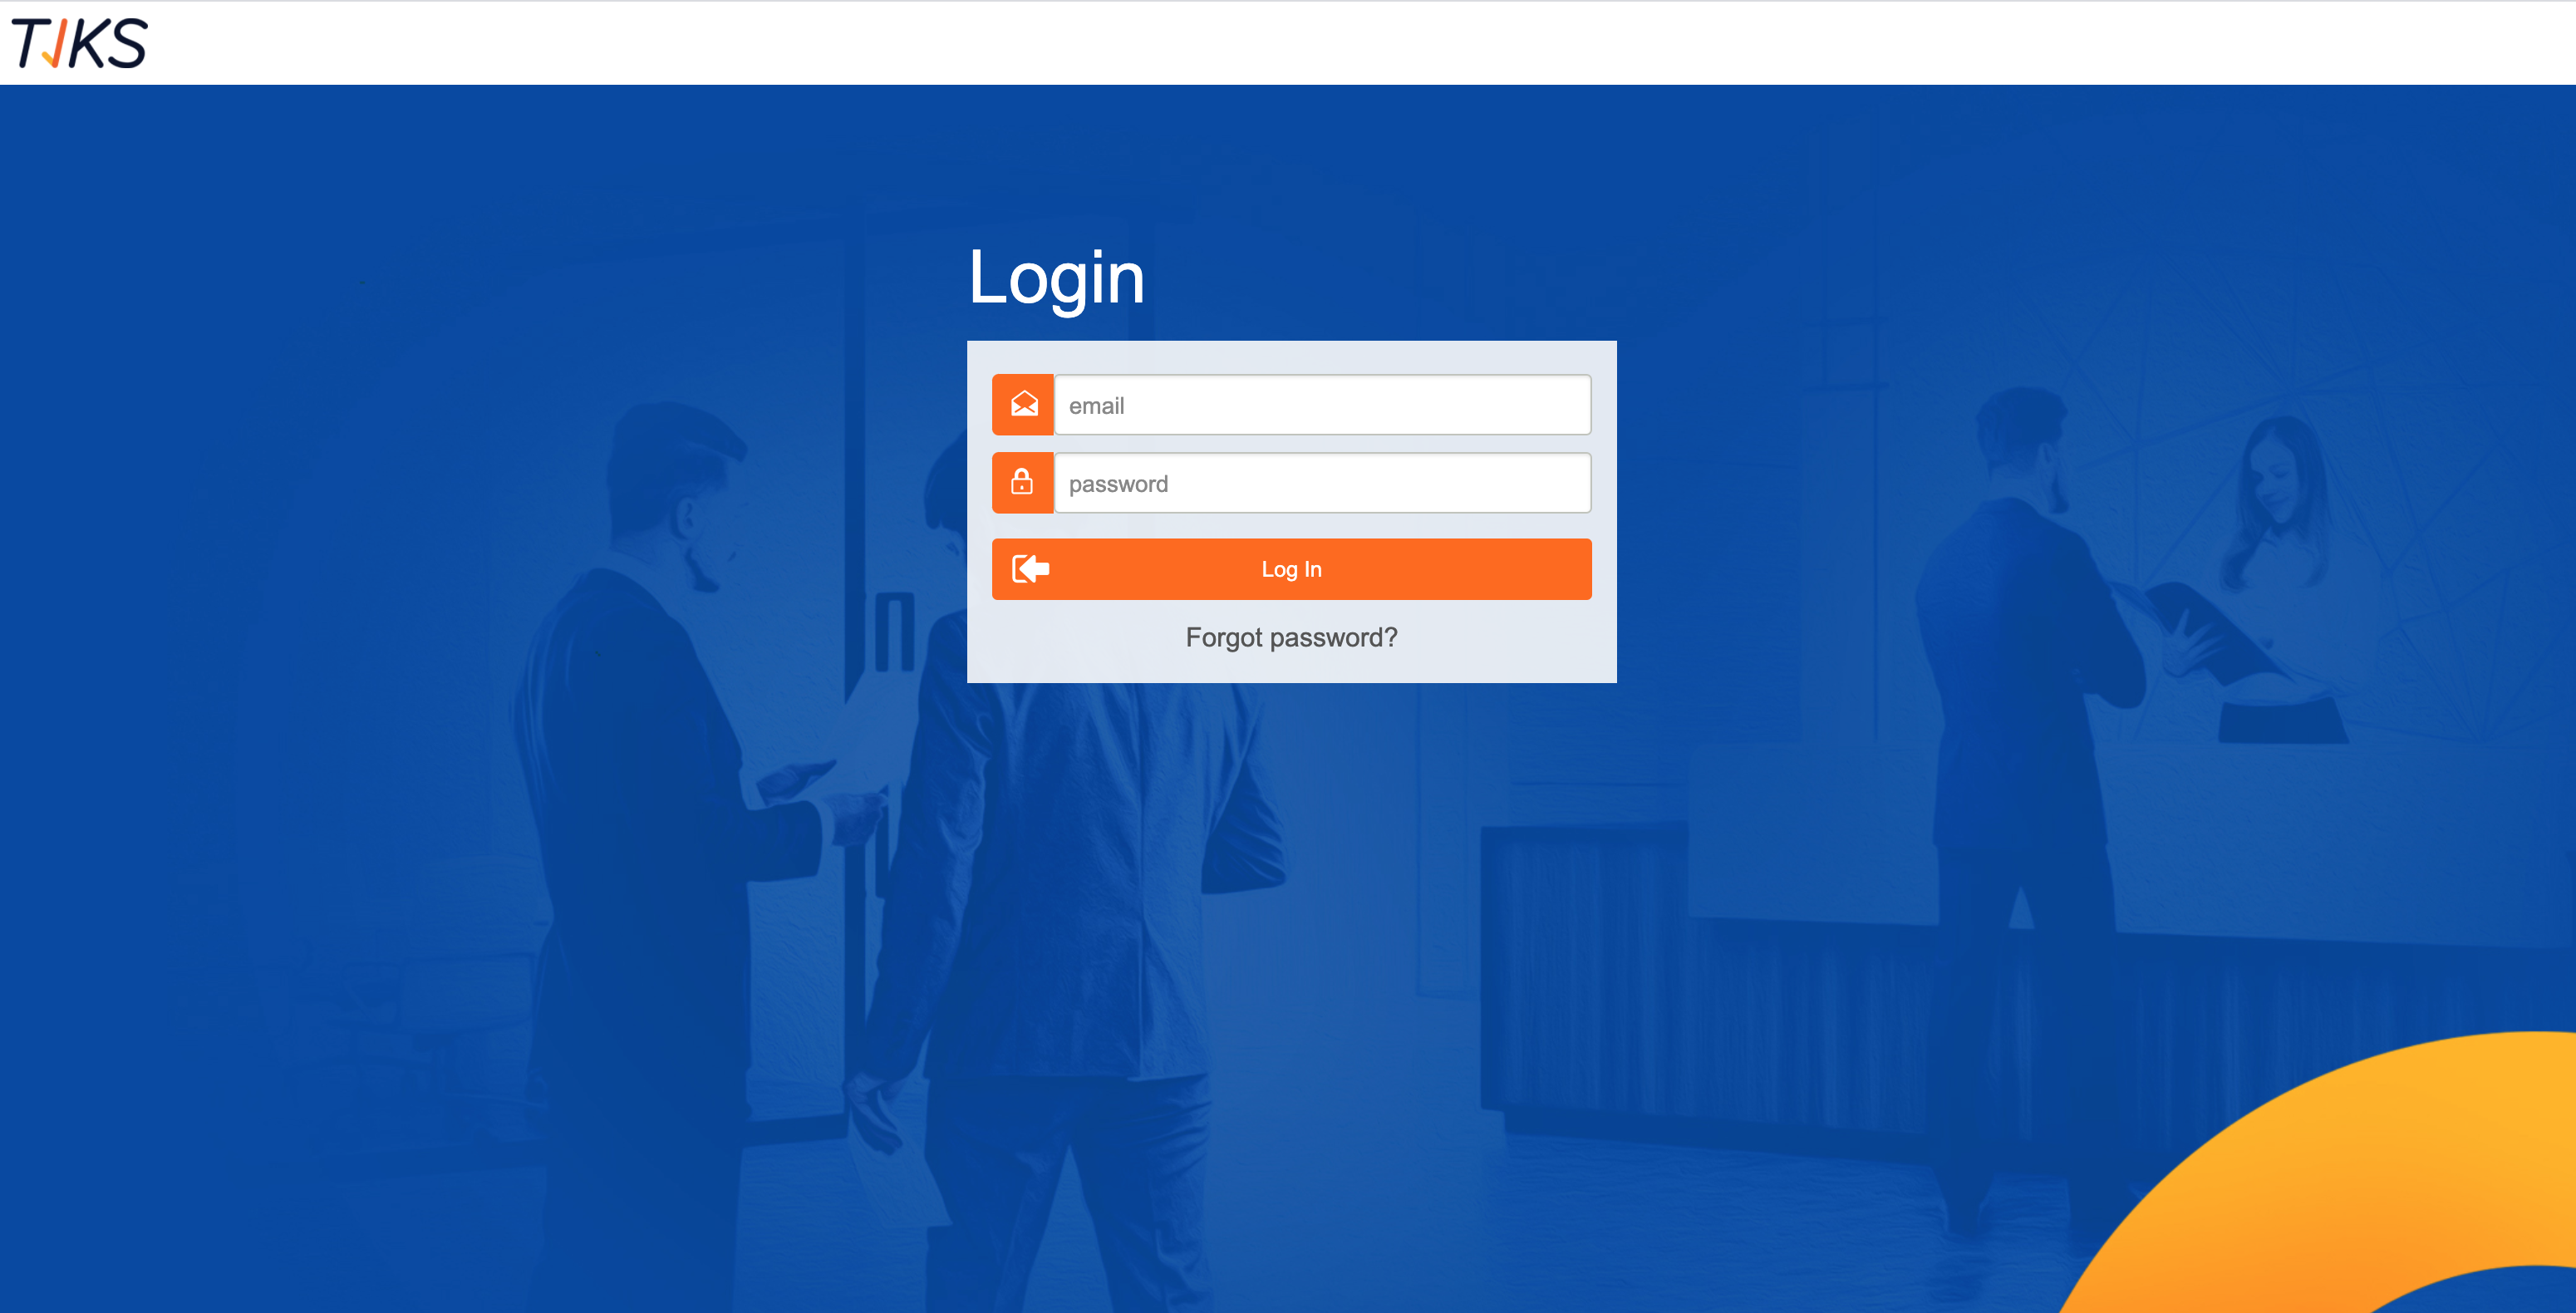
- You will receive an email with login instructions for TIKS Visitor Admin.
- You can log into the TIKS VMS admin portal using the URL provided by your account manager ie: https://company.visitor.tiks. com.au/dashboard
- By using the credentials that have been sent out to you via email, in order to login, simply type your email into the first field, and your password into the password field, and select the ‘log in’ button.
Forgot Password
- If you have forgotten your password, simply select ‘forgot password’ underneath the coloured ‘log in’ button.
- Re-type your email linked to your TIKS VMS admin portal account. Once you have done this, select the coloured ‘send password’ button, this will re-send you an email with instructions to reset your password
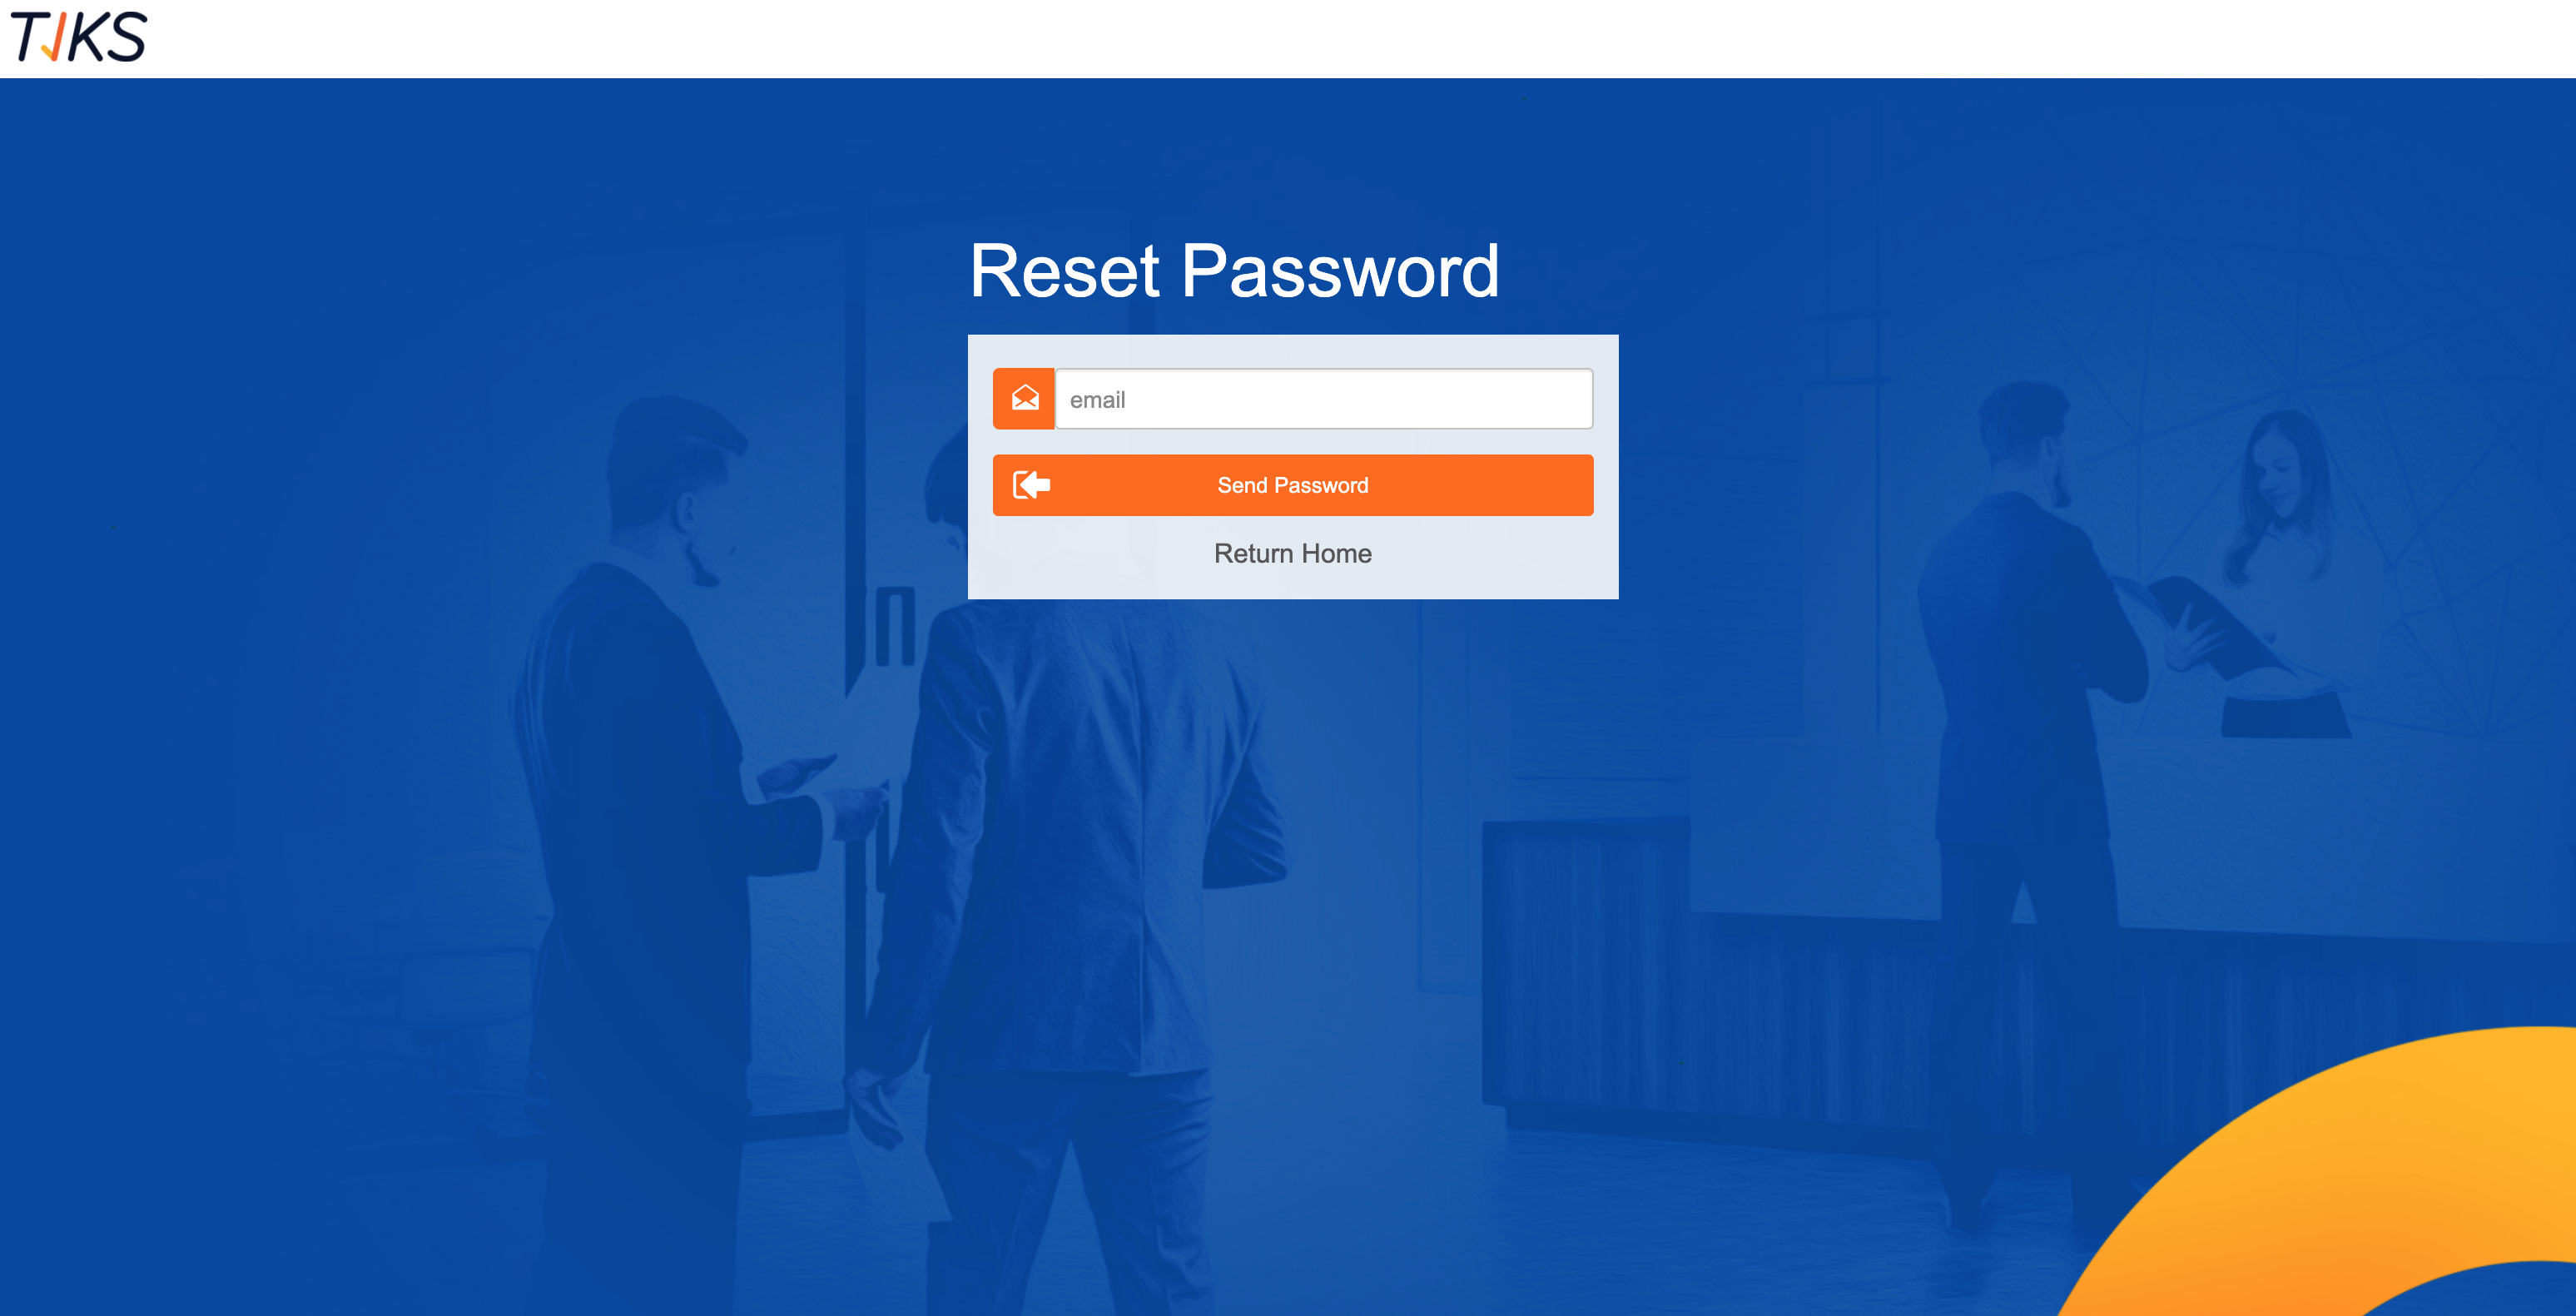
- You will receive a “Password Reset Link” Email. Click on the link within the email instructions to take you to the password reset.
- First Re-type your email linked to your TIKS VMS admin portal account. Then the new password you would like to change it to, and simply retype this password to confirm
Dashboard
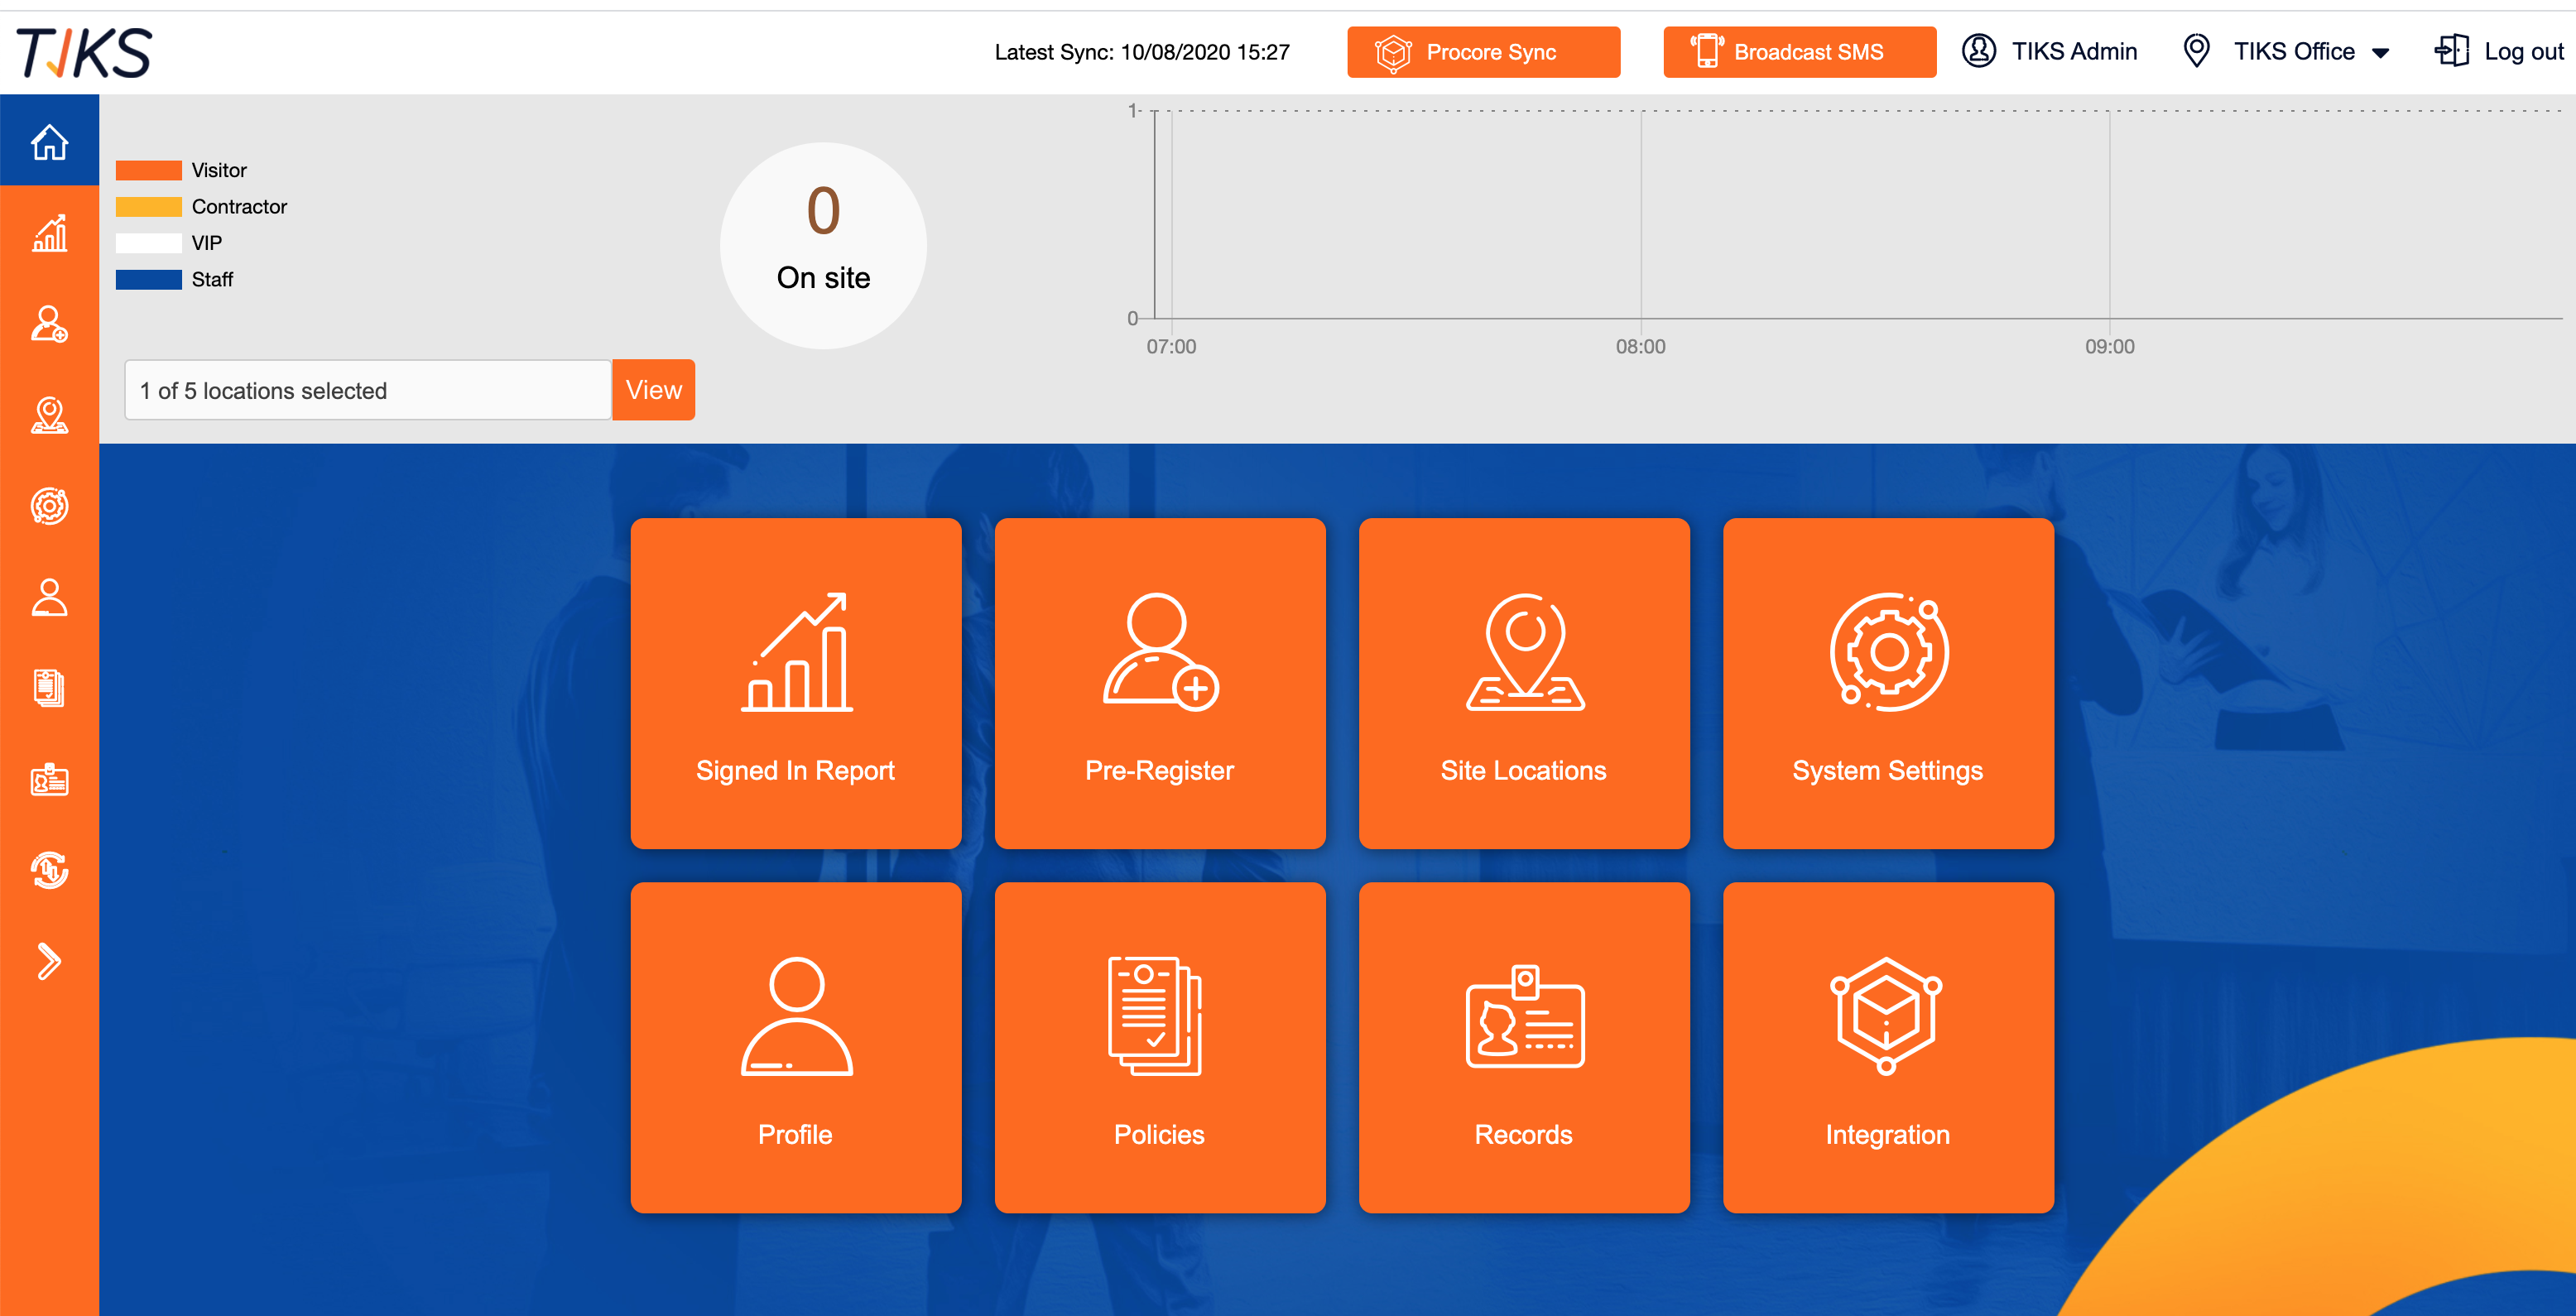
Top Bar
- Along the top of the page, you will see a grey bar, in the top left corner of the grey bar you will see your companies logo.
- Towards the right-hand side of the black bar, you can see a few different icons. The first icon displays the name you are logged in as well as acting as a link to the profile page.
- The 2nd icon details the site you’re logged into as well as acting a link to the locations page.
- The final icon is the ‘log out’ icon, if you select this, you will be logged out of the TIKS VMS admin portal.
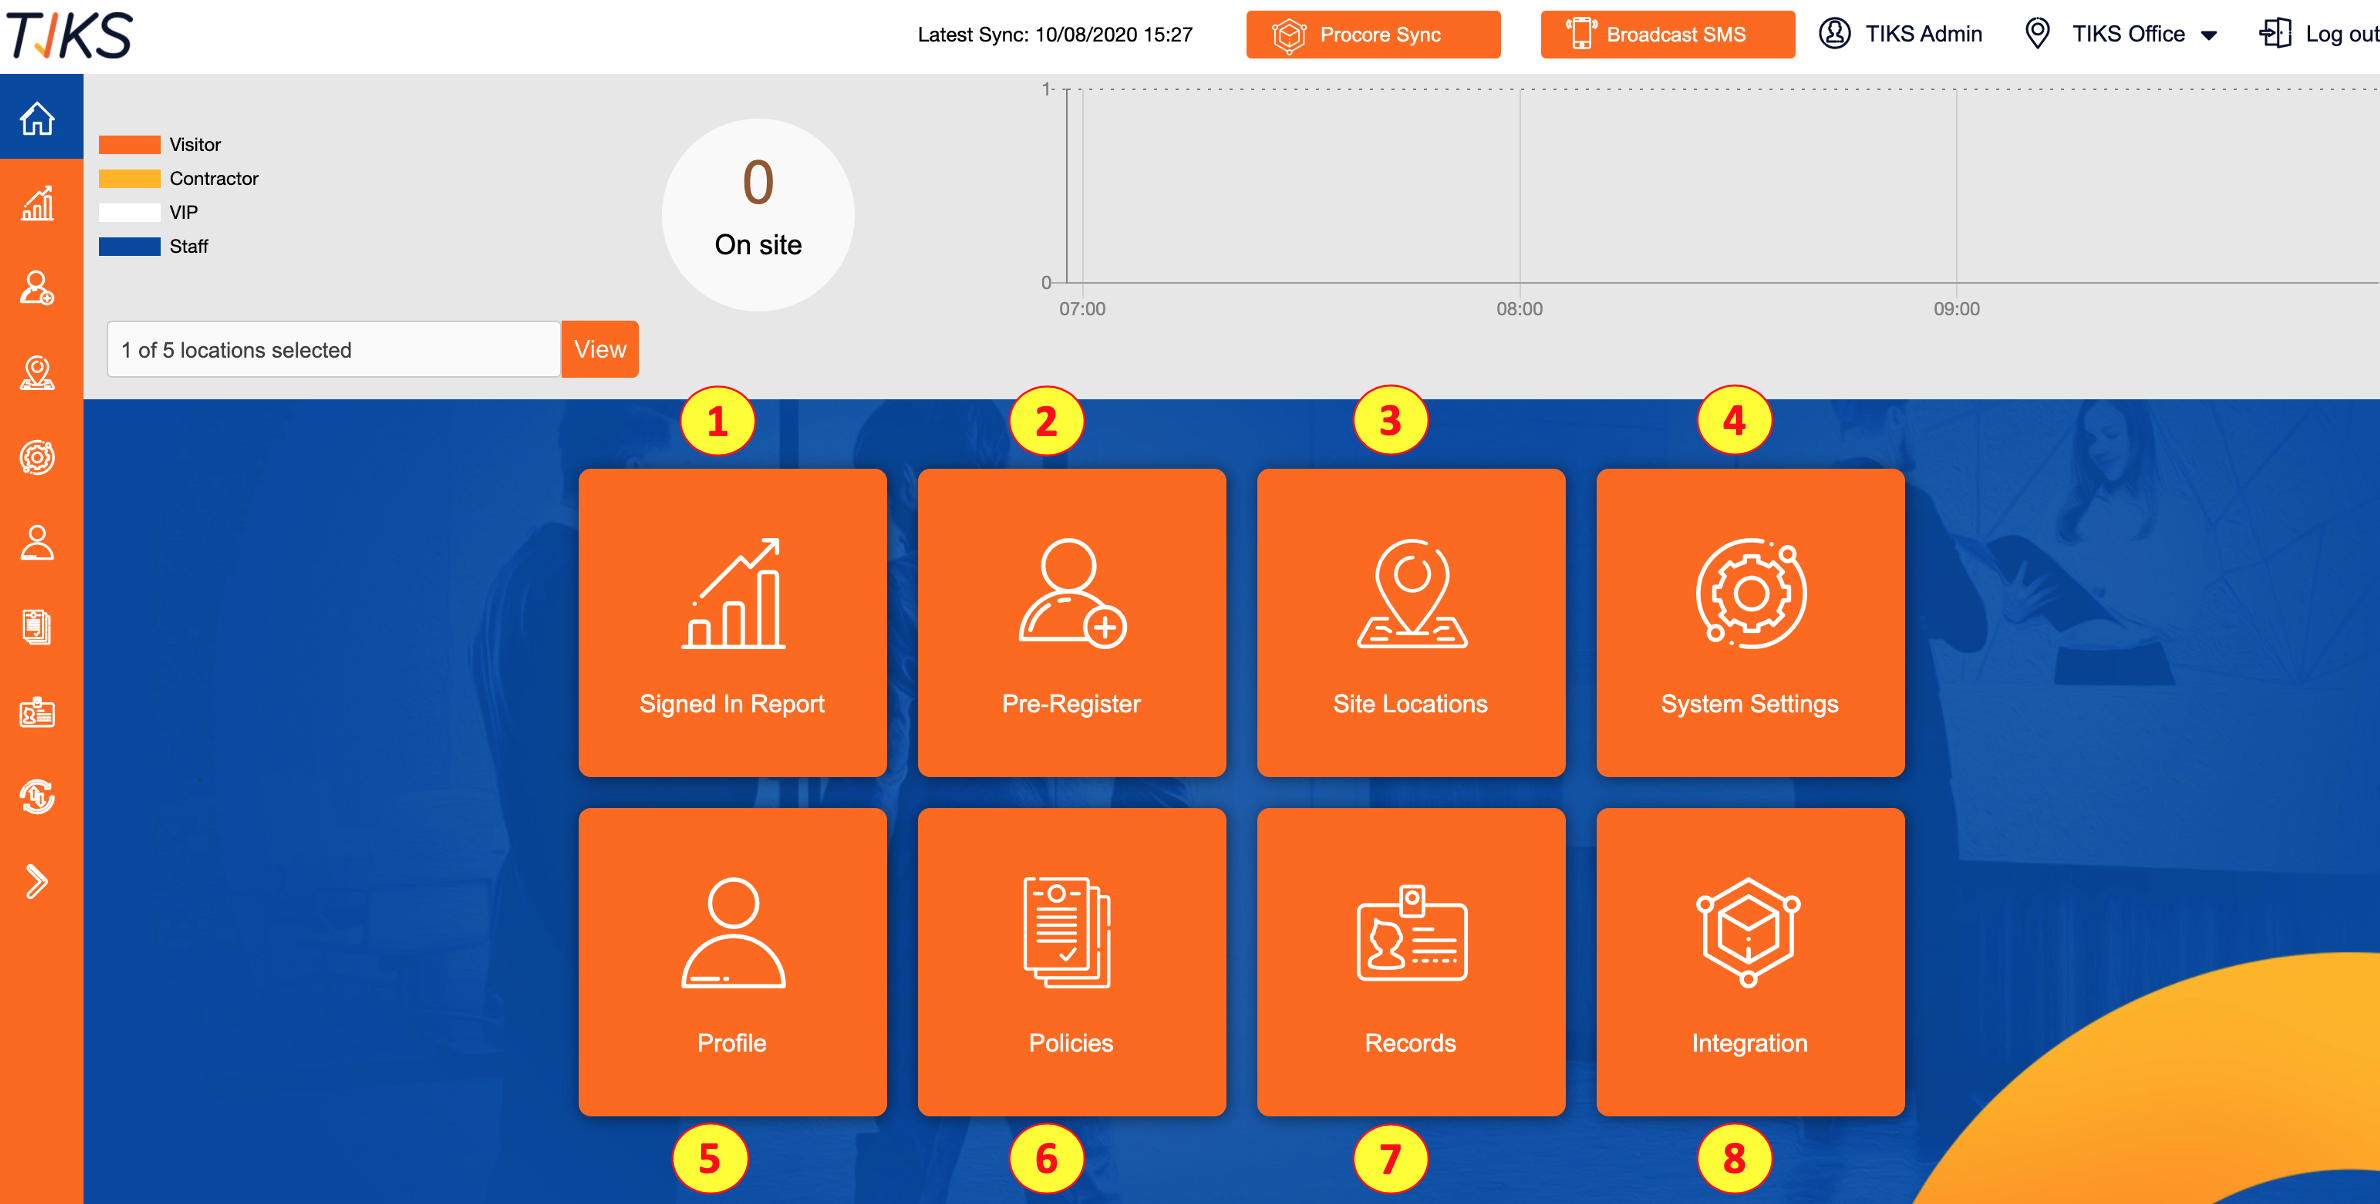
Charts

At the top of the dashboard, you can see 2 graphics, these allow you to see important dynamic information at a glance.
- Circular Graph: This circular graphics simply allows you to see dynamically, the total number of visitors currently on site
- Line Graph: This provides a little more detail, showing you the number of visitors on site at different time milestones throughout the day.
Tiles
On the dashboard, you will see 8 coloured tiles (depending on your permissions level) these represent the different sections of the TIKS VMS admin portal. These are also detailed in miniature down the left-hand side of the screen. Here’s a brief description of what those icons on the coloured tiles mean. This section allows you to run reports on visitors.
- Signed In Report: This section allows you to view a report on who has signed into your site
- Pre Register: This section allows you to pre register visitors.
- Site Locations: This section allows you to view site locations and edit details, it also allows you to switch between different sites (depending on your permissions level).
- System Settings: This section allows you to view, add and edit admin users, and to view the systems settings.
- Profile: This section allows you to view and edit your own account details.
- Policies: This is where you can view the companies policies and procedures
- Records: Records of all of the people who have visited the site/company
- Integration: this sections allows you to view what systems your platform integrates with.
Signed In Report
Touch the tile that indicates whether you are a Visitor, Contractor, Staff and also touch Sign out when leaving the site.
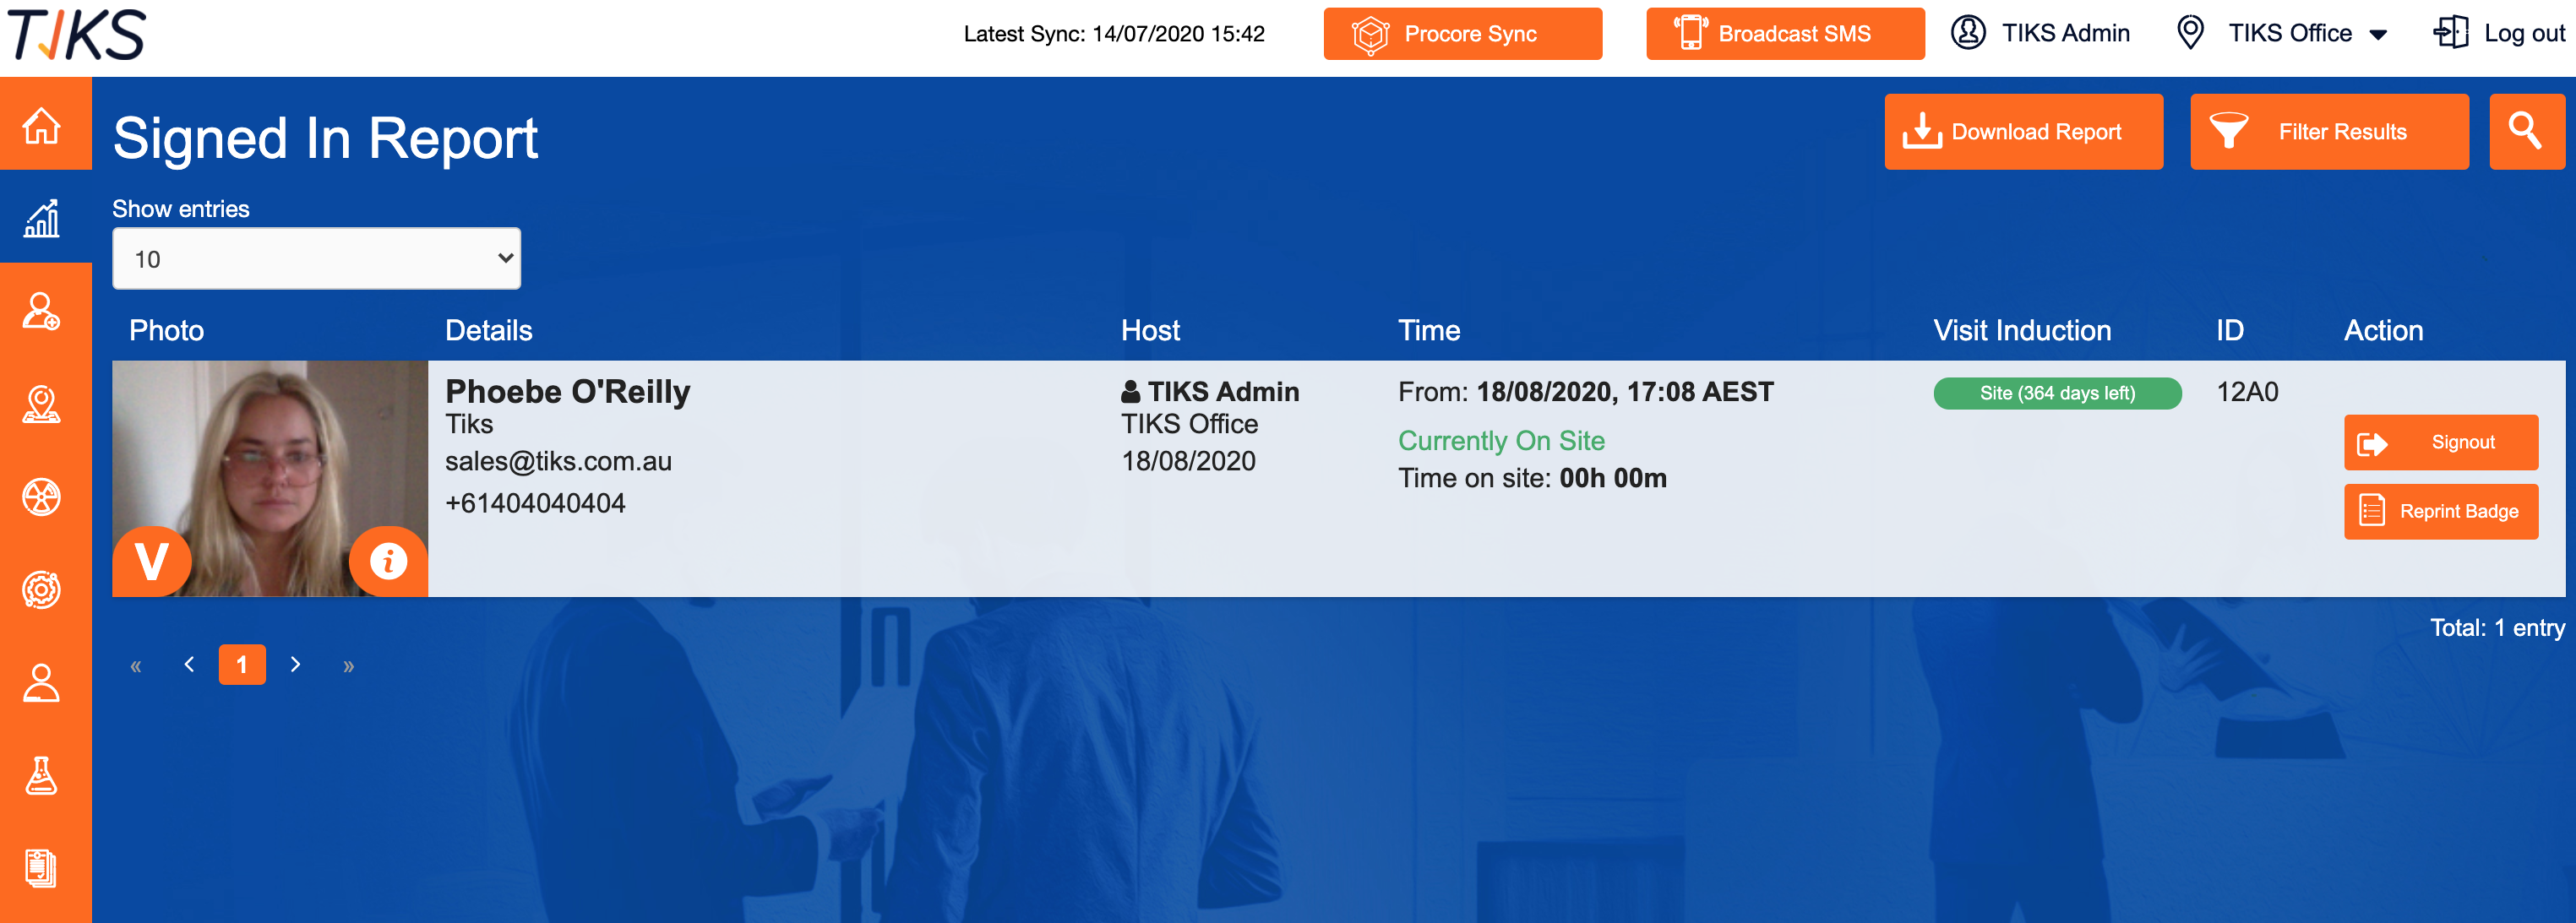
- Induction: This shows whether that visitor has a valid induction. If it’s valid, it will say “Valid” in green text with the number of days left until the induction expires in brackets. Induction validity periods are determined in the Global Settings section. If the induction has expired it will say “Expired” in red text and the user will be shown the induction slides when they next sign in at any kiosk/tablet. If the user has been pre-registered and they have not yet completed a site induction, it will say “Incomplete”.
- ID: This is a unique visit ID specific to that visit and that visitor, this is what is used to generate the QR code on the badge that the visitor receives. The visitor can use this ID to sign out quickly from one of the kiosks/tablets. If you have a QR code scanner integrated into your system, the visitor can scan the QR code on their badge to sign out.
- Action: This contains a ‘sign out’ button, which allows you to sign that particular visitor out. If that person has already signed out, the button will be greyed out, and you will not be able to select it.
Downloading the Visitor Report


You may need to download information from your visitor report for use in other reporting tools. We allow exporting of data in both PDF and CSV formats.
- Download Report: In the top right hand corner, you should be able to see a coloured button with the download icon, reading, “Download Report”. If you select the coloured “Download Report” button, you’ll see a pop-up with the following 2 options.
- PDF: If you select the coloured PDF option, you’ll see the window pop-up asking you to save the file, you can name it according to your own naming conventions and select save.
- XLS: If you select the coloured XLS option, and you will be able to download a CSV file of the Visitor Report.
 Filtering the Visitor Report

- In the top right hand corner of the Visitor Report page, after the coloured “Download Report” button there is a coloured “Filter Results” button, this allows you to manipulate the visitor data to suit requirements. The following will outline the parameters that you can filter the Visitor Report by

- Name: name of the visitor, you can use the first or last name, or both.
- Company: name of the company that the visitor belongs to.
- Visiting: name of the person the visitor is visiting.
- From date: sets the ‘from’ date parameter, if you don’t set this it will use the current date.
- To date: sets the ‘to’ date parameter, if you don’t set this it will use the current date.
- Visitor type: you can select either ‘visitor’ or ‘VIP’ from the drop-down, we will go into more detail regarding these user types later in the user guide.
- On site: you can either select ‘All of the above’, ‘On Site’, ‘Pre Registered’ or ‘Signed Out’ from the dropdown menu. This refers to whether the visitor is still on site or the other visit statuses.
- Site Induction status: you can either select ‘valid induction’ or ‘invalid induction’ from the dropdown menu.

-
To apply your filter, select the grey ‘filter’ text
in the bottom right-hand corner of the filter bar. You can use a combination of any of the filters together at any one time or you can choose not to use a
filter, in which case you will just be shown the current visitors on site. If there are no visitors on site currently you will see no results and the text will read, “No visitors are currently on site”. - To clear your selected filters, select the grey ‘clear’ text in the bottom right-hand corner of the filter bar
- To close the filter bar, select the grey ‘close’ text in the bottom right-hand corner.

Searching the Visitor Report
- In the top right-hand corner of the Visitor Report page, after the coloured “Download Report” and the coloured “Filter Results” button, there is a small search icon. If you’d like to find a specific entry in the Visitor Report page you can use this function. Simply select the coloured magnifying icon
- At the top of the page a slightly translucent blue bar will appear. You can start typing the desired search text and hit enter to complete your search.
Pre-Register
This allows you to send the visitor details of their visit, this is a good reminder to the visitor and also allows them to view important site information before arriving on site. If you pre register a user it can also make their sign in process faster as their details will be pre populated in the TIKS VMS system and so will auto fill some details when the visitor is signing in.
Pre Register Form
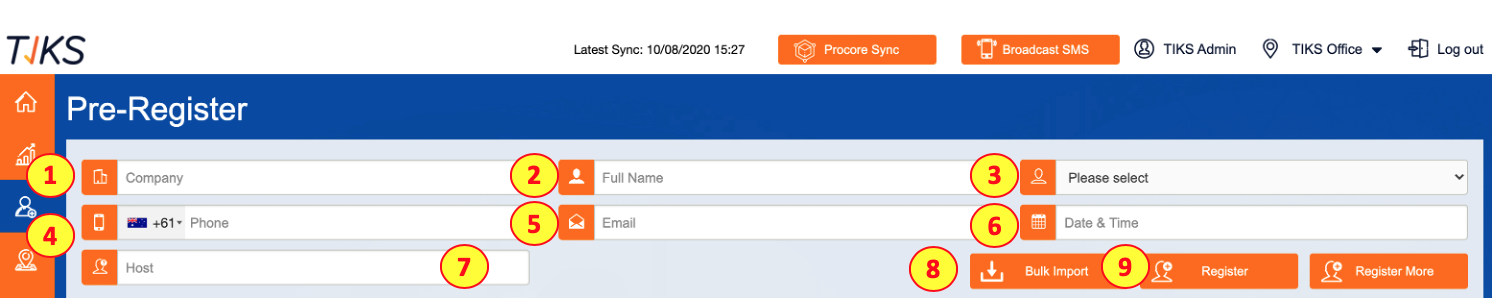
This form allows you to pre-register visitors by completing the following details;
- Company: This is the company the visitor belongs to.
- Full Name: This is the full name of the visitor.
- Chose if you are either a Visitor, Contractor, staff, VIP - if you set the visitor as a VIP, they will not need to view induction content and they can skip the taking of a photograph when signing in.
- Phone: Phone number and country code of the user.
- Email: This is the email address of the visitor, ensure there are no typo’s, as this will be where the badge and induction content will be sent.
- Visit Date & Time: This is the approximate time the visitor will arrive on site.
- Host: The visitor will need to indicate who their host is to access the site.
- Bulk Register: Bulk register is simply pre registering a group of visitors all at once, this is useful if you have many visitors you would like to pre register.
- Register: Once all of the fields have been filed out, click register.
Bulk Register
Bulk register is simply pre registering a group of visitors all at once, this is useful if you have many visitors you would like to pre register.

Bulk Register Form
Bulk register form gives you the options of downloading a CSV or Excel Template, you will need to fill out either one with the user information and import to the platform.
- CSV Template: This allows you to download a CSV Template, you will need to fill this out with the users information.
- Excel Template: This allows you to download a Excel Template, you will need to fill this out with the user information.
- Choose File: Choose the CSV or Excel file that you want to import.
- Import: Import the user information.
Site Locations
Sites Table
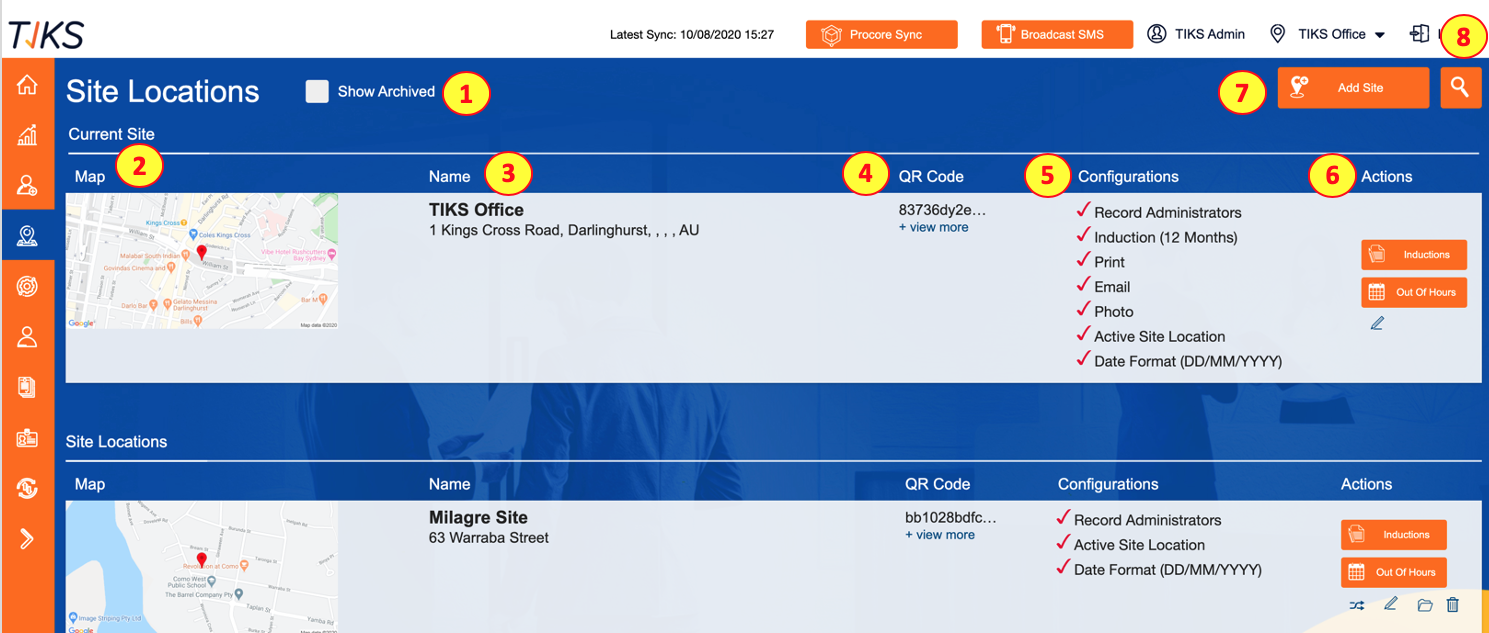
- Site Locations: This section shows a list of all of the site locations also available to switch to. This also includes all of the same details as the Current Site which will be explained.
- Map: This shows the map that is generated using a Google maps API from the input address.
- Name: This is the naming of the site, generally companies use the naming convention of the site street in order to make searches easier.
- QR Code: This is a unique string that is generated when a site location is created. This is the string used to create QR codes that you can display prominently at your site location for people to use if/ when you use the mobile integration for TIKS VMS.
-
Configurations: This shows at a glance
the configurations set for the site, the max configurations it will show will be; Induction (?? Months), Print, Email and Photo. If these are in use, they will be shown with a coloured tick for that site. - Actions: There are 5 different actions you can select from that will be explained in the next section
- Add Site: If you would like to add a new site to TIKS VMS, on the Site Location select the coloured “Add Site” button in the top right-hand corner, this will open up an Add Location pop-up. This will be explained further in a later. section.
- Search: If you’d like to find a specific site in the Site Location page you can use this function. Simply select the coloured magnifying icon and a slightly translucent black bar will appear along the top of the page. You just start typing the desired search text and hit enter to complete your search.
Sites Actions
-
Inductions: If you select this button, you can view and edit the induction slides for that site. Depending on how your site is set up, you will be able to see 3 tabs on the inductions page; Visitor, Staff and Contractor. You can have different induction content for each of these different user types and it will be shown to them when signing in.
When you toggle on 'Enable Expiry' and replace your induction, this will expire all inductions for all related users. - Schedule: This button allows you to leave a message on the tablet/kiosk for times when the desk is unmanned. It allows you to schedule an instruction message on the screen.
- Switch: This function allows you to switch to the selected site (dependant on your permissions level). Once you have successfully switched you’ll see the site you’re logged into in the “Current Site” section and you’ll also see the site name appear in the top right-hand corner of the black bar.
- Edit: This is the naming of the site, generally companies use the naming convention of the site street in order to make searches easier.
- Delete: This is a unique string that is generated when a site location is created. This is the string used to create QR codes that you can display prominently at your site location for people to use if/ when you use the mobile integration for TIKS VMS.
Adding a new Site Location
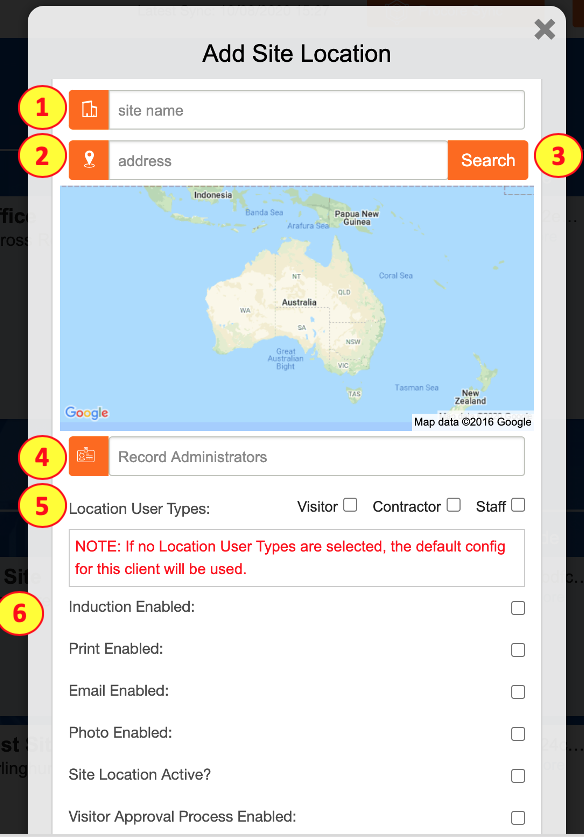
- Site name: Name of your new Site Location.
- Address: Typing in the address will automatically locate the address on the map within the image below.
- Search: Click search to find the address.
- Record Administrators: where you can populate one or many email addresses. When populated, those people will be the ones who receive emails on behalf of the client from the 'Records' module.
- Location User Types: Indicate if you are a Visitor, Contractor or Staff.
- Checkboxes: Select the checkboxes for the configurable settings - Inductions, Print, Email, Photo Site Location Active, Visitor Approval Process enabled. If you select to have inductions on, you will see a drop-down menu appear, this menu allows you to select how long the induction will be valid for.
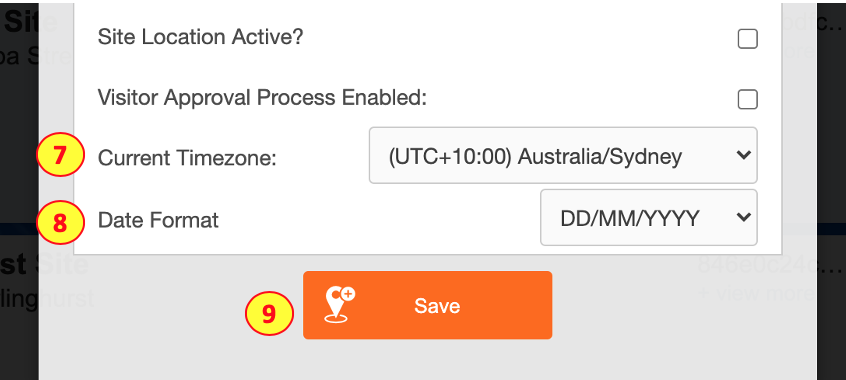
- Current Timezone: Indicate what time zone you are in.
- Date Format: Enter the date in DD/MM/YYYY
- Save: Once you have filled out the relevant fields, select the coloured Save button. Once successfully saved, the new Site Location will appear in the list.
TIKS Admin
This page allows you to view and edit your TIKS VMS admin portal details.
Admin Users
Admin Register Form
- Full Name: This is the full name of the Administrator.
- Email: Email address of the Administrator.
- Phone Number: Telephone number of the Administrator.
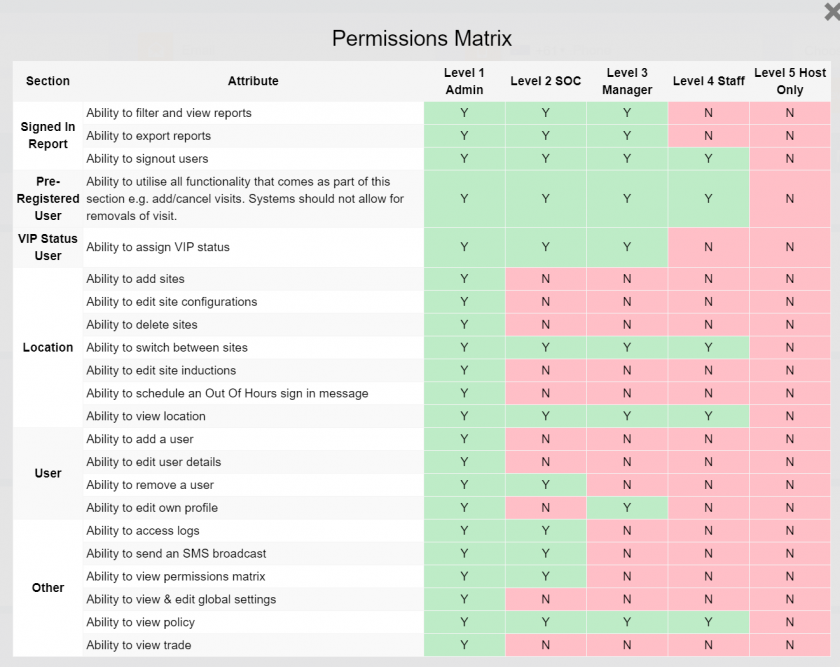
- Choose a role: This drop down allows you to select from different role types; from Level 1 Admin (full permissions) to Level 5 Host Only (no admin permissions, only allows name to be selected as a host).
Each role type has a different level of permissions which can be viewed in the permission matrix. - View Matrix: This displays the permissions for each of the different roles. Please check your own Admin Portal, as these permissions may change from time to time.
- Register: Clicking this will send an email to the email address entered within the Admin Register form and add them into the Admin Table below.
Admin Table
- Location: The site location the administrator belongs to.
- Permission Level: A reflection of the “Role” chosen in the above section.
- Member Since: This is the date that the administrator was registered on the system.
- Action: There are two different action buttons:
Edit: This function allows you to edit any of the above administrator details.
Delete: This function allows you to delete any of the TIKS VMS administrator accounts, if you select this button a confirmation pop-up will appear, asking you to confirm that you’d like to delete the user.
If you decide to delete an administrator account, they will no longer have access to the TIKS VMS administration portal.
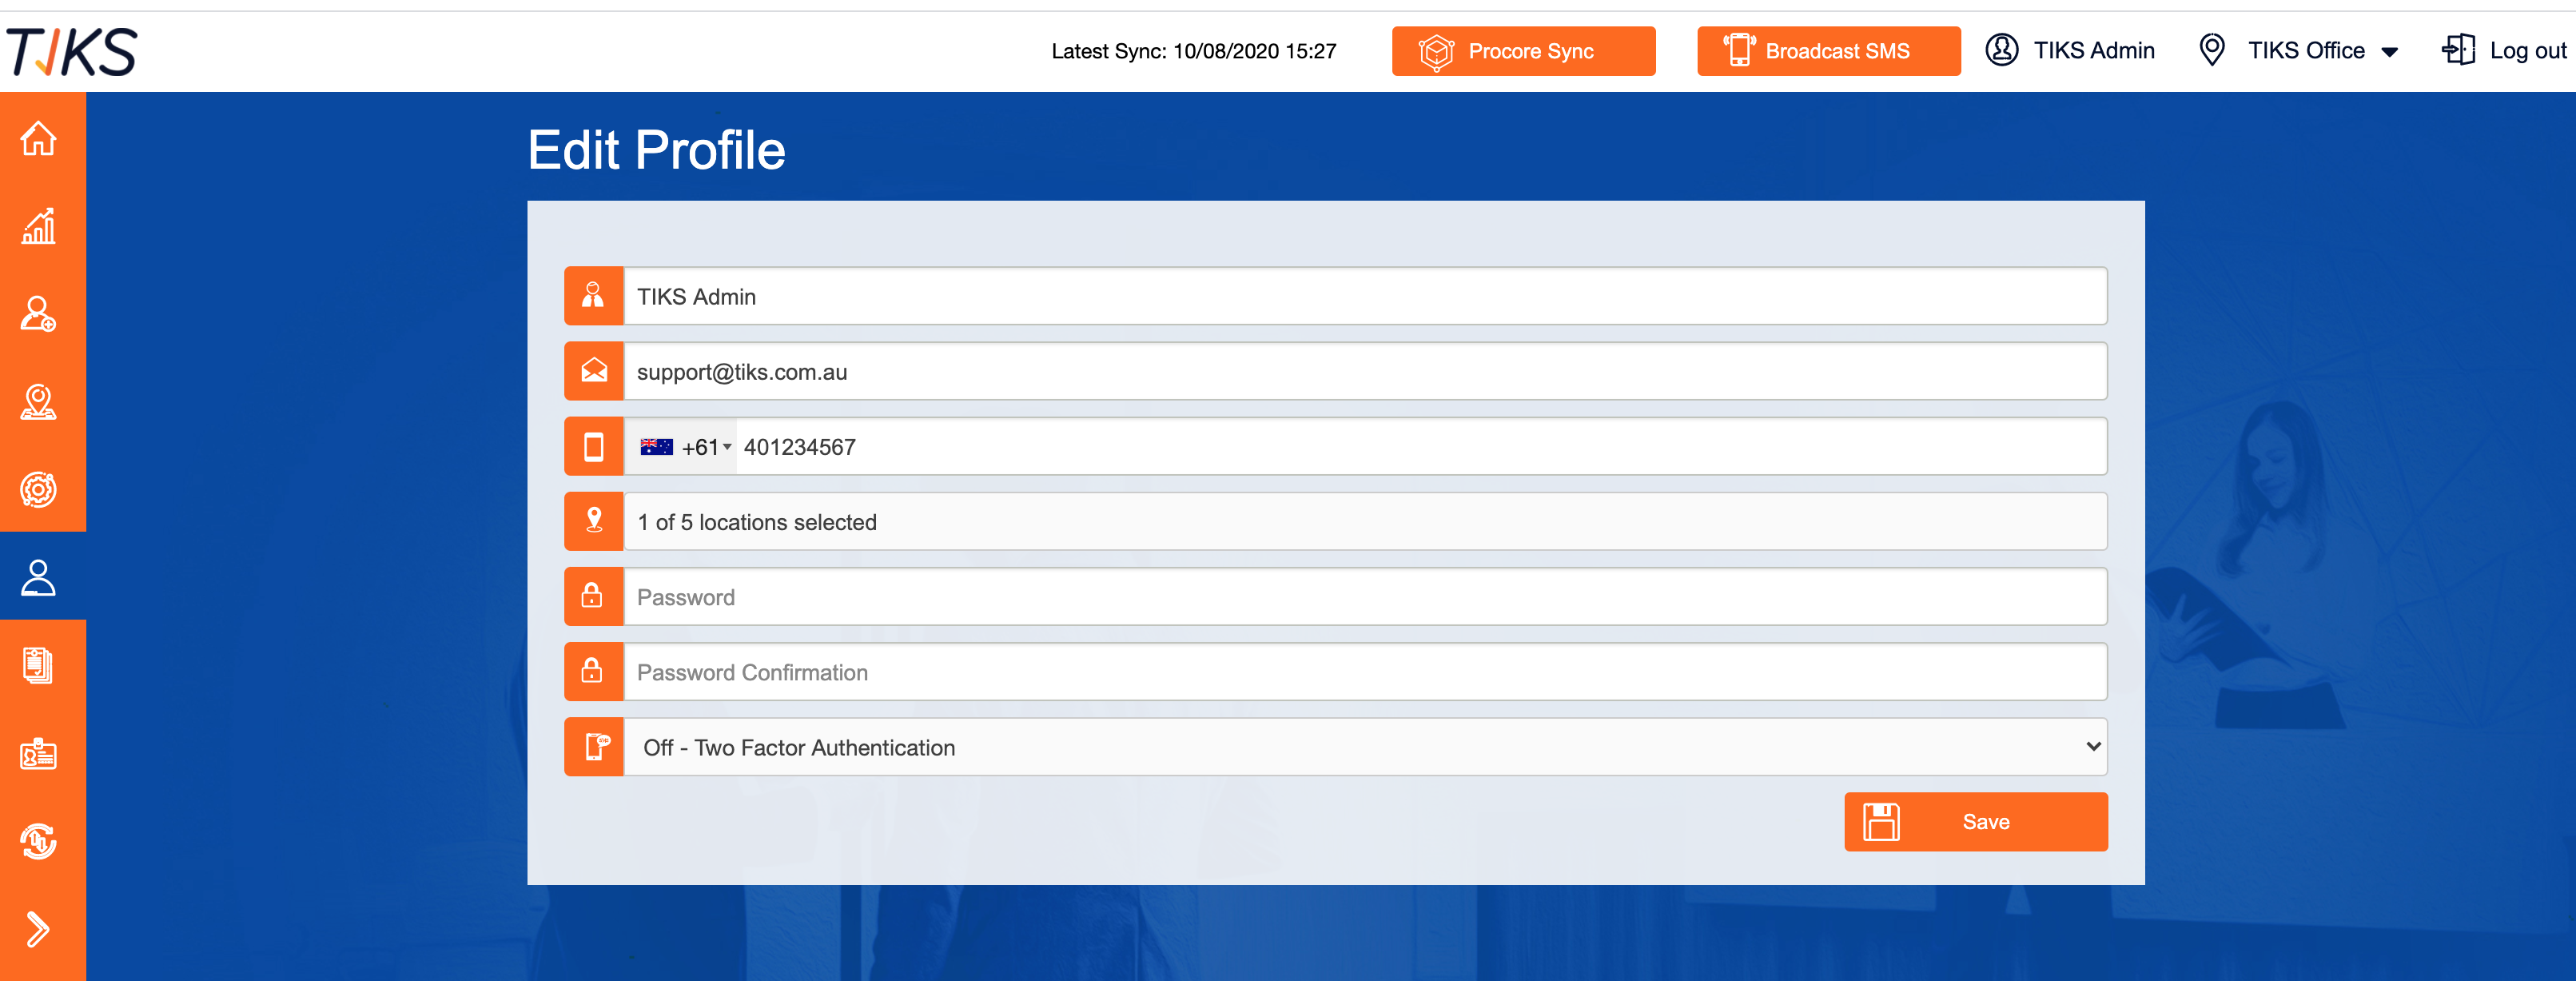
Edit Profile
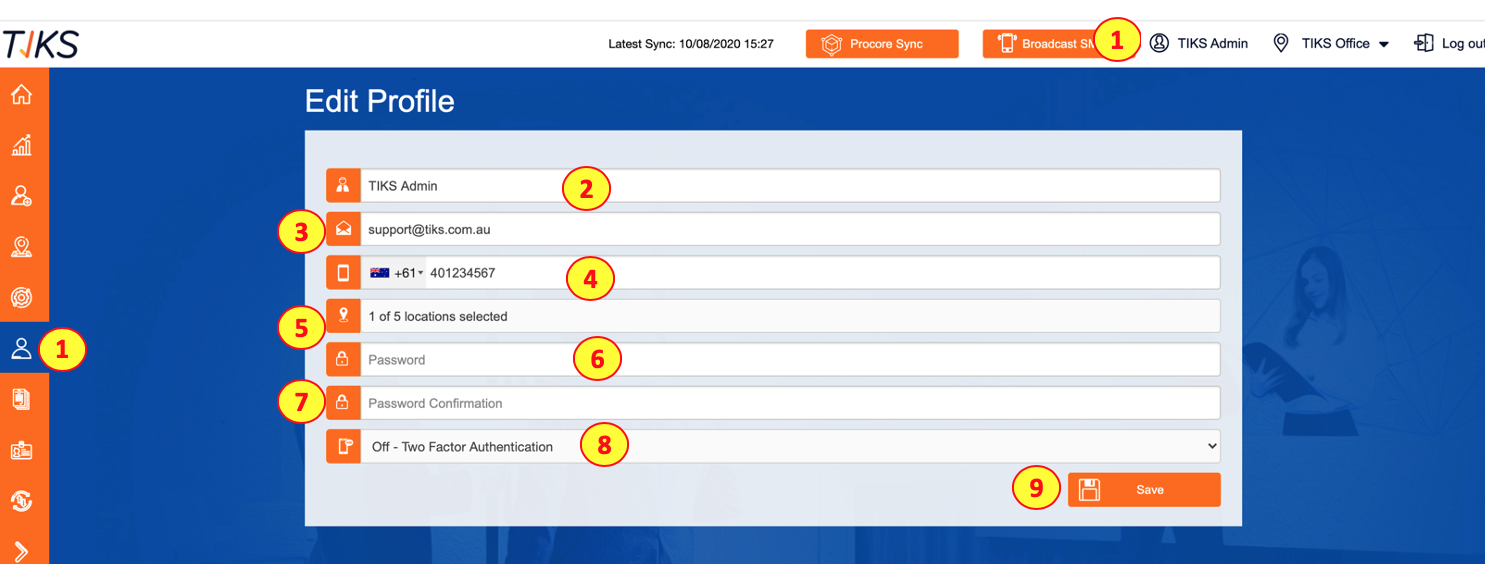
Edit Profile Form
- TIKS Admin: This page allows you to view and edit your TIKS VMS admin portal details.
- TIKS Admin: This needs to be your full name, you edit by selecting the name field, changing the details by typing and once you’re done, select the coloured ‘Save’ button.
- Email: There is validation on this field and so it has to be a valid email address with an “@” and “.com” for example email@example.com. You can edit your email address by selecting the field, changing the details by typing and once you’re done, select the coloured ‘Save’ button.
-
Phone Number: There is validation on this field and so the telephone number has to be between.
8 and 10 digits. You can edit your email address by selecting the field, changing the details by typing and once you’re done, select the red ‘Save’ button. - Locations Selected: Select which locations your site is.
- Password: For security reasons, in order to change any details in the password section, you must also type in your TIKS VMS admin portal password. If you’d like to change your password, simply type the desired password into the correct field and replicate exactly in the password confirmation field and select the coloured ‘Save’ button.
- Password Confirmation: Please retype and confirm your password.
- Turn on or off - Two Factor Authentication: Two-factor authentication is a security process in which users provide two different authentication factors to verify themselves.
- Save: Once you have filled out the relevant fields, select the coloured Save button.
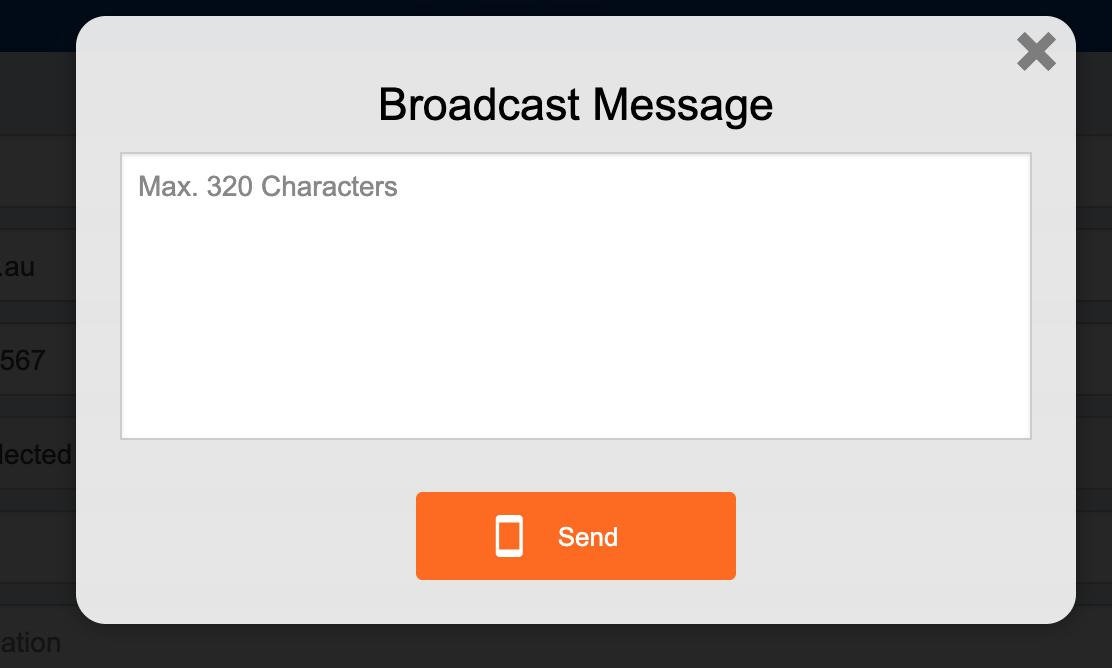
Broadcast SMS
1. Broadcast SMS: This function allows you to send a broadcast (SMS) to anyone onsite, used for evacuations or to alert users of a hazard.