How to Set Up Inductions for Site Locations
Site Locations
Site locations can be added manually by clicking Add Site. This is typically used when TIKS is used as a standalone package, not integrated to 3rd party applications.
Site Locations will be brought across to TIKS automatically if Procore integration is being used.
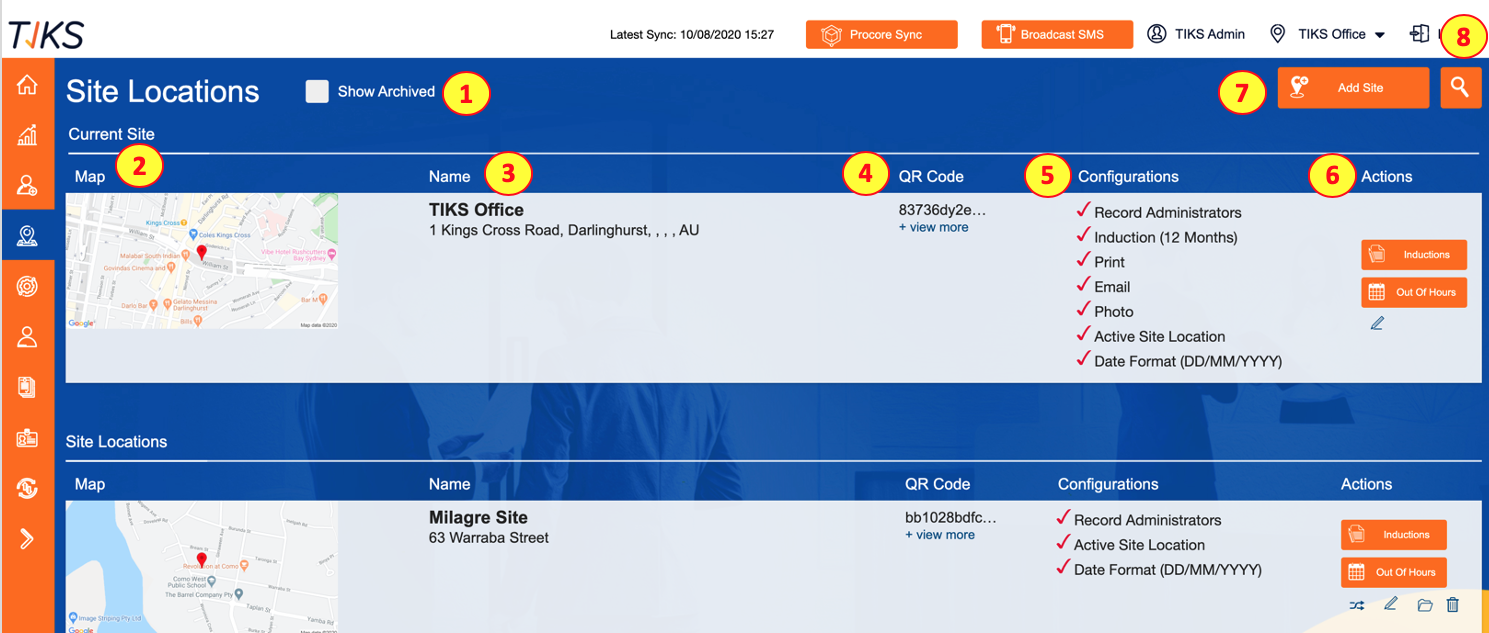
- Site Locations: This section shows a list of all of the site locations also available to switch to. This also includes all of the same details as the Current Site which will be explained.
- Map: This shows the map that is generated using a Google maps API from the input address.
- Name: This is the naming of the site, generally companies use the naming convention of the site street in order to make searches easier.
- QR Code: This is a unique string that is generated when a site location is created. This is the string used to create QR codes that you can display prominently at your site location for people to use if/ when you use the mobile integration for TIKS VMS.
-
Configurations: This shows at a glance
the configurations set for the site, the max configurations it will show will be; Induction (?? Months), Print, Email and Photo. If these are in use, they will be shown with a coloured tick for that site. - Actions: There are 5 different actions you can select from that will be explained in the next section
- Add Site: If you would like to add a new site to TIKS VMS, on the Site Location select the coloured “Add Site” button in the top right-hand corner, this will open up an Add Location pop-up. This will be explained further in a later. section.
- Search: If you’d like to find a specific site in the Site Location page you can use this function. Simply select the coloured magnifying icon and a slightly translucent black bar will appear along the top of the page. You just start typing the desired search text and hit enter to complete your search.
Sites Actions
- Inductions: If you select this button, you can view and edit the induction slides for that site. Depending on how your site is set up, you will be able to see 3 tabs on the inductions page; Visitor, Staff and Contractor. You can have different induction content for each of these different user types and it will be shown to them when signing in.
- Schedule: This button allows you to leave a message on the tablet/kiosk for times when the desk is unmanned. It allows you to schedule an instruction message on the screen.
- Switch: This function allows you to switch to the selected site (dependant on your permissions level). Once you have successfully switched you’ll see the site you’re logged into in the “Current Site” section and you’ll also see the site name appear in the top right-hand corner of the black bar.
- Edit: This is the naming of the site, generally companies use the naming convention of the site street in order to make searches easier.
- Delete: This will delete the Site Location.